
How to Grow Garlic on a Large Scale: Complete Farm Guide
Quick answer: To grow garlic on a large scale you plant graded cloves from clean, certified seed stock into well drained loam at roughly 250,000 to 320,000 plants per hectare, cover them 4 to 8 cm deep in autumn, hold the crop weed free through the critical period from day 25 to day 115, meet peak water demand during bulb initiation and fill, stop irrigation two to three weeks before lifting, harvest when five to six lower leaves have browned, cure at 26 to 32 degrees Celsius with strong airflow, then grade and store cold at 0 to 2 degrees Celsius or warm and dry at 18 to 25 degrees Celsius. A well run commercial block returns 12 to 18 tonnes per hectare.
Here is the part nobody tells you before your first commercial season. Garlic is not a difficult crop to grow. It is a brutally unforgiving crop to grow badly at volume. A tomato grower who misses a week can often recover. A garlic grower who misses the planting window by three weeks, or lets weeds run for a fortnight in March, or lifts the crop four days late in a wet spell, has already decided the outcome of a nine month season. The plant gives you one shot at every decision, and then it waits underground for two hundred days while you find out whether you got it right.
That is also why garlic rewards good operators so well. The gap between a poorly managed hectare at 6 tonnes and a well managed hectare at 16 tonnes is not usually about climate or genetics. It is about timing, seed quality, water discipline and record keeping. Every one of those is under your control.
This guide walks the entire production system from field selection through to the pallet leaving your cold store. It is written for growers scaling past the market garden stage, for agronomists building a protocol, and for investors who need to understand where the money actually goes. Throughout, you will find calculators that let you run your own numbers rather than borrowing somebody else’s, because a seeding rate that works in Shandong will bankrupt you in Sindh.
Key Takeaways Before You Read Further
- Seed is your biggest single cost, typically 25 to 35 percent of the variable budget, and clove grade drives yield more than any fertiliser decision.
- Garlic never closes canopy, so weed competition is a permanent threat rather than an early season one.
- Bulb size is decided in a narrow window, roughly six to eight weeks around bulb initiation and early fill. Water or nitrogen stress in that window cannot be recovered later.
- Post harvest handling determines profit, not just yield. A 16 tonne crop cured badly can be worth less than a 12 tonne crop cured well.
- White rot is permanent. One contaminated seed lot can take a field out of Allium production for four decades.
- Cash flow runs negative for nine months. Finance the whole cycle before you plant the first clove.
What Large Scale Garlic Farming Actually Involves
Before we get into agronomy, it helps to agree on what we are talking about. “Large scale” means different things to a grower in Gilroy, California and a grower in Bogura, Bangladesh.
How Big Is Large Scale
For practical purposes, garlic production splits into four operating tiers, and each tier has a completely different cost structure, labour model and equipment list.
| Tier | Typical area | Defining constraint | Labour model |
| Market garden | Under 2 hectares | Time and hand labour | Owner plus casual help |
| Small commercial | 2 to 10 hectares | Planting and harvest bottlenecks | Small permanent crew plus seasonal |
| Mid scale commercial | 10 to 40 hectares | Curing and storage capacity | Permanent crew, contract harvest |
| Industrial | Over 40 hectares | Seed supply and packhouse throughput | Full time team, mechanised line |
Once you pass about 8 hectares, three things change permanently. Planting has to be mechanised or the window closes on you. Curing has to be forced air or you cannot dry the volume before neck rot sets in. And seed has to be planned a full year ahead, because nobody carries 15 tonnes of graded seed garlic in stock when you phone in September.
Use the land area converter if you are working between acres, hectares, bighas or kanals, because seed and fertiliser rates published in one unit and applied in another is a surprisingly common and expensive error.
Where Garlic Money Is Made and Lost
Garlic profitability rests on four multipliers, and they compound.
Yield per hectare is the obvious one. Doubling yield from 8 to 16 tonnes roughly halves your cost per kilogram. Grade out percentage is the quiet one. If 40 percent of your crop falls below premium size, you sell nearly half your tonnage into the cheapest channel. Storage loss is the invisible one. Losing 18 percent in store over six months is normal for a badly cured crop and unnecessary for a well cured one. Price realised is the one growers obsess over and control least, though marketing choices genuinely move it.
Run all four together in the crop profit comparison calculator before you commit land to garlic instead of a competing crop. Garlic ties up a field for eight to ten months. That opportunity cost is real.
Who This Guide Is For
If you are growing 300 bulbs for a farmers market, much of this will be overkill. If you are planting your first 5 hectares, or scaling from 10 to 50, this is written for you. Regional specifics vary, so pair this with your national extension service. The Penn State Extension garlic production guide and the Oregon State University vegetable production notes on garlic are both excellent free references, and the UC IPM Pest Management Guidelines for Onion and Garlic remain the most rigorous public pest reference available in English.
You can also browse the full library of crop guides for rotation partners that fit alongside garlic.
Understanding the Garlic Plant Before You Commit Land
Most expensive garlic mistakes trace back to a misunderstanding of the plant itself. Garlic, Allium sativum, is a perennial grown as an annual, propagated vegetatively, and driven by two environmental signals rather than by a grower’s calendar. Get the biology and the agronomy follows naturally.
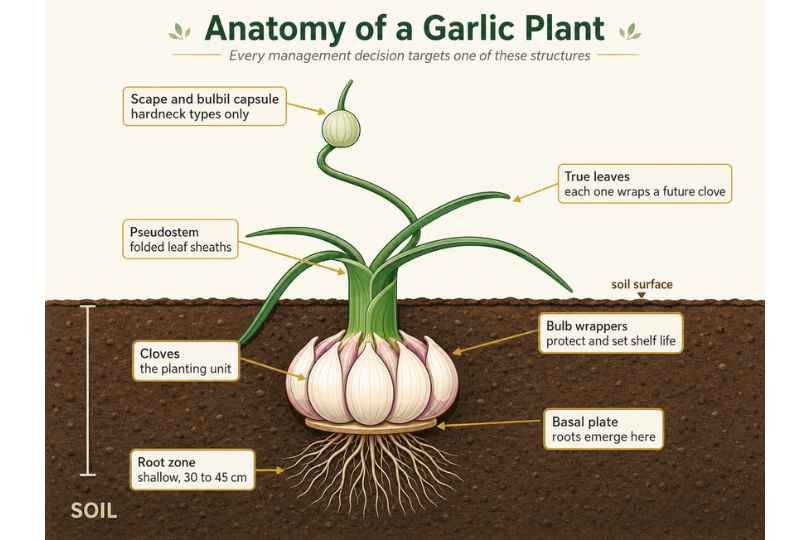
Figure 1. Anatomy of the garlic plant. Every management decision you make targets one of these structures.
Work through the plant from the ground up and each structure tells you something operationally useful.
The basal plate is a compressed stem. All roots emerge from it, and it is also the entry point for Fusarium basal rot and white rot. Anything that damages the basal plate at planting, from rough cracking to a badly set planter, opens a door for soil pathogens.
The roots are shallow and unbranched, usually concentrated in the top 30 to 45 cm. Garlic is a poor forager. It will not chase nutrients or moisture down the profile the way a maize root system does. That single fact explains why garlic needs frequent light irrigation rather than occasional heavy irrigation, and why fertility has to be placed where those shallow roots actually are.
The cloves are lateral buds, each one a genetic copy of the parent. This is why clove size matters so much and why disease travels in seed stock.
The leaves are the yield engine, and here is the detail that changes how you think about harvest. Each leaf connects down to one bulb wrapper. When a leaf dies, its wrapper begins to break down. Counting green leaves at harvest is therefore counting the intact wrappers that will protect your bulb in storage.
The pseudostem is folded leaf sheath, not true stem. It stays soft in softneck types, which is why they braid, and lignifies in hardnecks, which is why they do not.
The scape is the flower stalk that hardnecks throw. It carries bulbils, tiny aerial cloves, and it competes directly with the bulb for photosynthate.
The Clove Is a Bud, Not a Seed
This is the most important sentence in the whole guide. Commercial garlic is not grown from true seed. Every clove you plant is a clone, carrying whatever viruses, nematodes and fungal spores its parent carried.
The consequences run through your entire operation:
- Disease accumulates across generations of saved seed rather than resetting each year.
- Genetic improvement happens by selection within your own stock, slowly, not by buying an improved variety each season.
- Seed volume is enormous. You are planting 1.2 to 1.8 tonnes per hectare of the same commodity you are trying to sell.
- Seed quality is a production input on par with soil, not an afterthought.
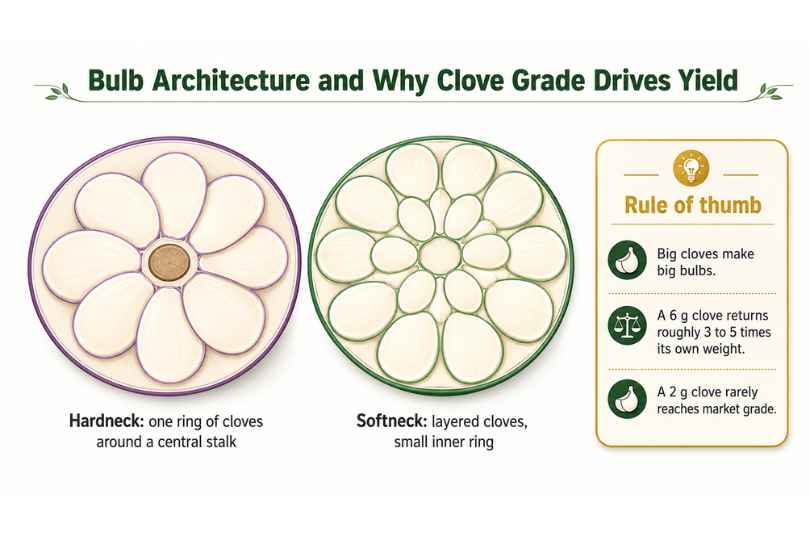
Figure 2. Bulb architecture in hardneck and softneck types, and why clove grade drives final bulb weight.
Vernalization: The Cold Requirement That Decides Everything
Garlic will not form cloves unless the plant has experienced sufficient cold. This process, vernalization, is why garlic is autumn planted almost everywhere it is grown commercially.
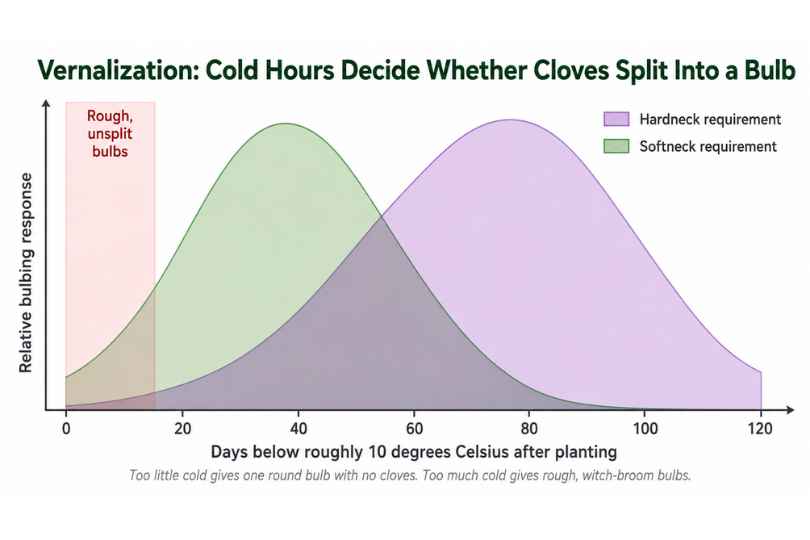
Figure 3. Vernalization response. Cold exposure after planting determines whether a clove differentiates into a multi clove bulb.
The practical rule: most types need somewhere between 4 and 10 weeks below roughly 10 degrees Celsius. Hardnecks generally need more, softnecks less, and the requirement is genetic rather than universal.
Three failure modes follow directly.
Insufficient cold gives you a “round”, a single undifferentiated bulb with no cloves. Rounds are not worthless, and they make excellent seed for the following year, but they are not a marketable crop.
Excessive or interrupted cold, or excessive nitrogen combined with cold, gives you rough bulbs, side shoots and witch broom growth. Bulbs split their wrappers and store badly.
Correct cold gives a clean, well filled bulb with the clove count characteristic of the variety.
If you farm in a mild winter region, you have two options. Choose low chill softneck types adapted to your latitude, or pre chill your seed cloves at 4 to 10 degrees Celsius for four to eight weeks before planting. Pre chilling is standard practice in subtropical production and it is worth trialling on a small block before committing your whole seed lot, because over vernalized seed produces the rough bulbs described above.
Track your actual accumulated cold with a growing degree days calculator rather than assuming this winter matched last winter.
Day Length and Bulb Initiation
The second signal is photoperiod. Once vernalized, garlic begins bulbing when day length exceeds a variety specific threshold, generally 13 to 14 hours, usually reinforced by rising temperature.
This is the mechanism behind the single most common commercial failure: planting too late. A late planted crop meets the lengthening days with too few leaves. Since each leaf feeds a clove and stores photosynthate, a plant with six leaves at bulb initiation simply cannot build the bulb that a plant with nine or ten leaves can. The crop bulbs on schedule regardless. It just bulbs small.
Everything in the planting section of this guide exists to serve one goal: maximum leaf area before the day length switch flips.
What Happens When the Signals Are Wrong
| Symptom at harvest | Most likely cause | Fix for next season |
| Single round bulbs, no cloves | Not enough cold | Longer vernalization, or a lower chill variety |
| Small bulbs, correct clove number | Late planting or low leaf area | Plant three to five weeks earlier |
| Rough bulbs with side shoots | Over vernalization or excess early nitrogen | Reduce pre chill, move nitrogen later |
| Bulbs split in the ground | Harvest delay, or irregular water | Earlier lifting, steadier irrigation |
| Very variable bulb size in one block | Ungraded seed | Grade cloves into three size bands and plant separately |
Choosing Varieties for Commercial Production
Variety choice sets your ceiling. Every other decision in this guide works within limits your genetics have already fixed.
Hardneck Versus Softneck
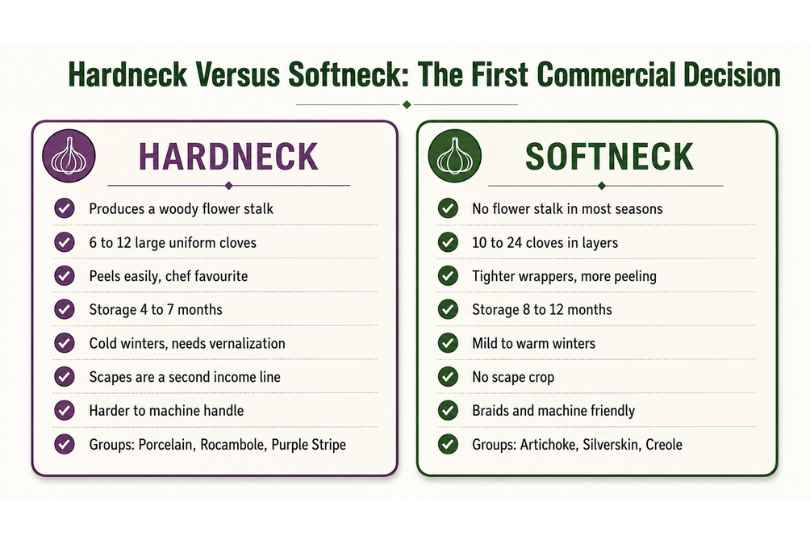
Figure 4. Hardneck and softneck garlic compared on the traits that matter to a commercial operation.
The commercial trade offs are consistent worldwide.
Hardnecks produce fewer, larger, easier peeling cloves and a scape crop you can sell. Flavour is generally more complex, which supports premium and chef channels. They handle cold winters. Against that, they store four to seven months rather than eight to twelve, they are more fragile through mechanical handling, and the scape removal pass adds labour.
Softnecks produce more cloves in layers, store far longer, tolerate mechanical handling, braid for retail, and suit warmer winters. They are the backbone of industrial production and the dehydration trade. Against that, cloves are smaller and less uniform, peeling is slower, and there is no scape income.
The scale answer is usually not “one or the other”. Many mid scale growers run 70 percent softneck for volume, storage and contract supply, and 30 percent hardneck for premium fresh market, scapes and seed sales.
The Ten Horticultural Groups
Within those two categories, garlic is usually sorted into ten groups. Knowing them saves you from buying the same genetics under three different names.
Porcelain
Hardneck. Four to six very large cloves in a bright white, tightly wrapped bulb. Strong flavour, excellent cold hardiness, high market appeal. Fewer cloves per bulb means a higher seed requirement by weight. Popular commercial types include Music and German Extra Hardy.
Rocambole
Hardneck. Eight to twelve cloves, loose easy peeling skins, and the flavour profile chefs pay for. The commercial catch is storage. Rocamboles are among the shortest storing garlics, often only four to five months, and their loose wrappers make them fragile in bulk handling. Suited to direct market channels, not long haul distribution.
Purple Stripe
Hardneck. Striking purple striped wrappers, eight to twelve cloves, and a strong reputation for roasting. Better storage than Rocambole. The marbled and glazed subgroups extend the range with heavier wrappers and improved shelf life.
Artichoke
Softneck. The commercial workhorse across warm and mild regions. Twelve to twenty cloves in overlapping layers, high yield, long storage, tolerant of a wide range of conditions. California Early is the classic type. Occasionally throws a partial scape under stress, which can confuse first time growers.
Silverskin
Softneck. The longest storing group, often ten to twelve months, with tight silvery wrappers and strong pseudostems that braid beautifully. Small cloves and slow peeling limit fresh market appeal, but for storage programmes and late season supply they are unmatched. California Late is the reference type.
Creole, Turban, Asiatic and Middle Eastern
These four groups occupy the warm climate niche. Creoles handle heat well and store a long time, with attractive rose to purple wrappers. Turbans mature very early, which is commercially valuable for hitting the first market window. Asiatics also mature early and produce large cloves. Middle Eastern types are the least widely grown outside their home range but are worth trialling in hot dry production zones.
Matching Variety to Market
| Target market | Priority traits | Best fit groups |
| Supermarket contract | Uniformity, storage, machine tolerance | Artichoke, Silverskin |
| Restaurant and chef | Flavour, clove size, peel ease | Rocambole, Purple Stripe, Porcelain |
| Dehydration and processing | Solids content, volume, storage | Silverskin, Artichoke |
| Seed stock sales | Vigour, clean health status, clove size | Porcelain, Purple Stripe |
| Early season fresh market | Early maturity | Turban, Asiatic |
| Long storage programme | Wrapper integrity, dormancy | Silverskin, Creole |
Running a Variety Trial Before You Scale
Never scale a variety on somebody else’s data. Bulb performance is intensely local.
Plant a replicated trial one full season ahead of your commercial planting. Use three to five candidate varieties, three replicated plots each, 100 plants per plot, randomised across the block so you are measuring genetics and not soil variation. Record emergence percentage and date, leaf count at bulb initiation, harvest date, total and marketable yield, average bulb diameter, clove count and weight, storage loss at three and six months, and any disease incidence.
That trial costs you a few hundred plants and one season. Scaling the wrong variety across 20 hectares costs you a year of revenue. ## Site Selection and Land Assessment
You cannot fertilise your way out of a bad field. Site selection is the highest leverage decision in this entire guide and the only one that is effectively irreversible once the crop is in the ground.
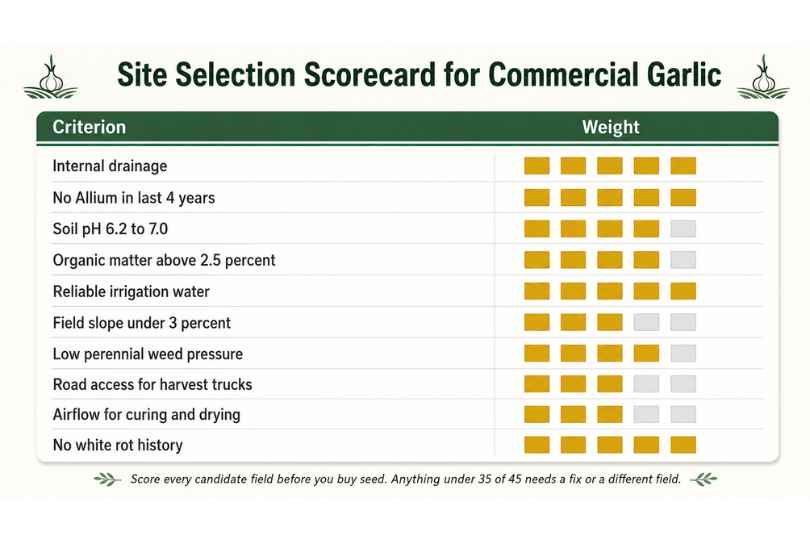
Figure 5. A weighted scorecard for evaluating candidate garlic fields before committing seed.
Drainage Comes First
Garlic sits in cool, wet soil for months. Waterlogging for even 48 hours during winter kills roots, invites basal rot, and produces the classic pattern of a healthy looking crop with mysterious bare patches in spring.
Test drainage properly rather than guessing. Dig a hole 30 cm deep and 30 cm wide, fill it with water, let it drain completely, then fill it again and time the second drain. Under 2 hours is excellent. Two to 6 hours is workable. Over 12 hours means you either raise beds aggressively, install subsurface drainage, or walk away from the field.
Raised beds are the standard answer and they are not optional in heavy ground. A 20 to 25 cm raised bed lifts the clove above the perched water table and warms the root zone earlier in spring.
Check your compaction risk before you plan tillage using the soil compaction risk estimator, because a compaction pan at 25 cm will undo any amount of surface bed forming.
Soil Texture and Structure
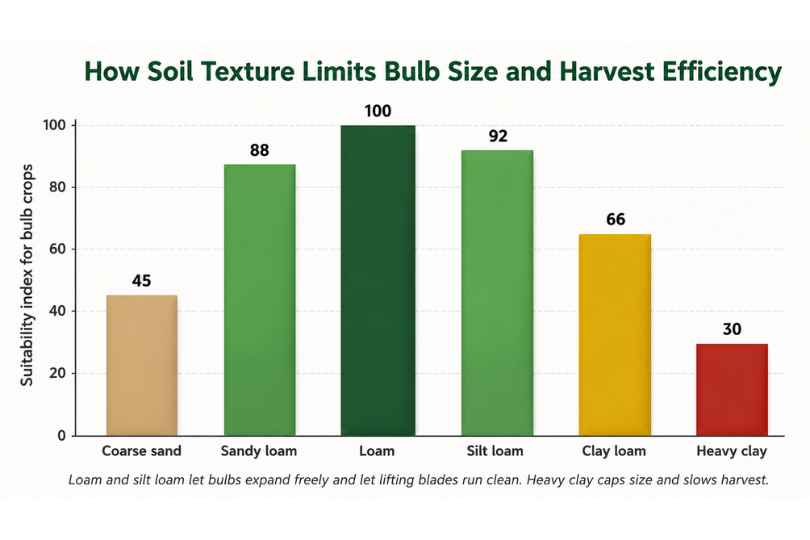
Figure 6. How soil texture limits achievable bulb size and harvest efficiency.
Garlic wants a friable, medium textured soil that lets a bulb expand without resistance and lets a lifting blade run clean.
Loam and silt loam are ideal. Bulbs size freely, moisture holds well, and harvest is efficient.
Sandy loam works well with reliable irrigation and gives the cleanest harvest of all, since soil falls away from the bulbs. It demands more frequent irrigation and more careful nitrogen management because both leach.
Clay loam produces good crops in the right hands but requires disciplined bed forming and careful timing. Work it wet and you will fight the resulting clods for the entire season.
Heavy clay physically restricts bulb expansion, holds water dangerously in winter, and turns harvest into an ordeal of soil coated bulbs that will not dry properly.
If you are unsure of your texture class, run your field samples through the soil texture classifier rather than relying on a feel test.
Stone content matters more than growers expect. Stones deform bulbs, damage lifting equipment, and end up in bulk bins where they injure other bulbs during handling.
Rotation History and the Allium Rule
Do not plant garlic where any Allium has grown in the last four years. That includes onion, leek, shallot, chive and volunteer alliums in a previous crop. Three years is the absolute minimum and four to five years is the professional standard.
The reason is soilborne disease. White rot sclerotia, Fusarium, and stem and bulb nematode all build under Allium crops and persist afterwards.
Good preceding crops break disease cycles and leave good structure: cereals such as wheat, barley or oats; brassicas including mustard as a biofumigant; and legumes for nitrogen, though you must then reduce your nitrogen budget accordingly.
Poor preceding crops include any Allium, potato where it shares soilborne problems in your region, and long term pasture, which carries wireworm and heavy perennial weed seed banks.
Map this out properly with the crop rotation planner, and keep the record. In five years you will not remember which block carried onions.
Water Access and Quality
Garlic needs 450 to 650 mm of water across a season depending on climate, and it needs it reliably. A field with beautiful soil and unreliable water is a bad garlic field.
Quantify three things before you commit.
Volume. Can you deliver peak demand during bulb fill, which may be 5 to 7 mm per day across the whole block simultaneously? Size this with the crop water requirement calculator.
Quality. Garlic tolerates moderate salinity poorly. Electrical conductivity above roughly 1.7 dS per metre starts to cost yield. Test irrigation water for EC, sodium adsorption ratio, bicarbonates and iron. High bicarbonate and iron will also block drip emitters.
Pressure and infrastructure. Check whether your pump can actually run the block you plan using the irrigation pump selection calculator.
Slope, Aspect and Airflow
Keep slope under 3 percent where possible. Steeper ground erodes during winter rain and makes mechanised planting and harvest awkward.
Aspect matters in cool regions. A south facing slope in the northern hemisphere warms earlier and brings the crop forward, which can be worth real money if you are chasing the first market window.
Airflow through the canopy dries leaves after dew and rain, which directly suppresses downy mildew, rust and Botrytis. Frost pockets and sheltered hollows are exactly where foliar disease starts.
Infrastructure and Logistics
Garlic is heavy and time critical at harvest. Before planting, confirm that harvest trucks can reach the field in the conditions likely at lifting time, that you have curing capacity within a short haul, that you have grid or generator power at the curing site, and that you have covered storage for graded product.
A grower with 30 hectares of beautiful garlic and curing capacity for 10 hectares does not have a 30 hectare business. They have a 10 hectare business and 20 hectares of expensive compost.
Scoring Candidate Fields
Score every candidate field against the weighted scorecard in Figure 5 before you buy seed. Anything scoring under about 35 out of 45 needs a specific remediation plan or a different field. Convert your block areas accurately with the land area converter so your seed and input orders match the ground you actually have.
Soil Preparation and Fertility Planning
Garlic sits in the same ground for eight to ten months and has a weak root system. Everything it needs has to be present, available and correctly placed before the roots go looking.
Start With a Real Soil Test
Not a general one. A proper one, taken 4 to 6 months before planting so you have time to act on it.
Sample each management block separately at 0 to 20 cm and 20 to 40 cm, taking 15 to 20 cores per block in a zigzag pattern, avoiding headlands, gateways and old manure heaps.
Ask the lab for pH and buffer pH, organic matter, cation exchange capacity, phosphorus, potassium, calcium, magnesium, sulphur, base saturation percentages, and the micronutrients zinc, boron, manganese, iron and copper. Add a nematode assay if there is any Allium history in the district.
Interpret your CEC properly with the cation exchange capacity calculator, because CEC tells you how much nutrient your soil can even hold and therefore whether you should be splitting applications heavily or not. A sandy soil with a CEC of 6 needs a completely different programme from a clay loam at 22.
If any result looks marginal, run it through the soil nutrient deficiency checker before you build the programme.
Correcting pH
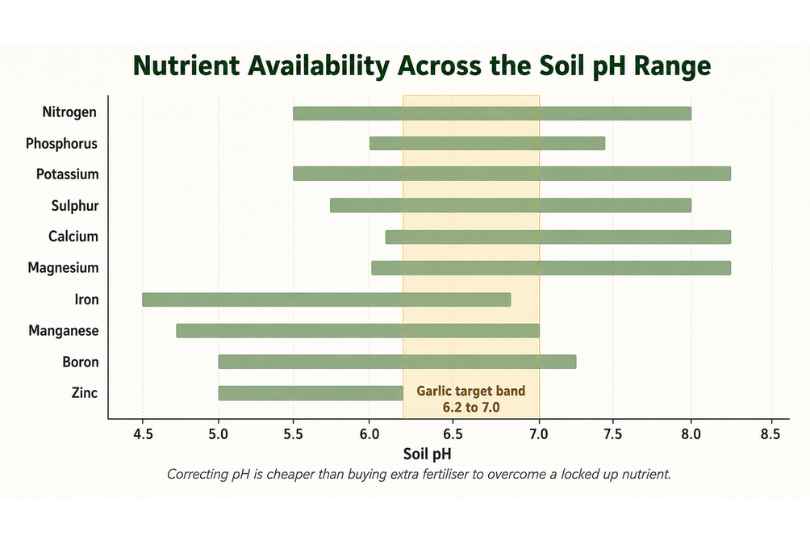
Figure 7. Nutrient availability across the soil pH range, with the garlic target band highlighted.
Garlic performs best between pH 6.2 and 7.0. Below 6.0 you lose phosphorus and molybdenum availability while manganese and aluminium become problematic. Above 7.5 you lose zinc, iron and manganese.
Lime is slow. It needs three to six months and incorporation to depth to work properly, so apply it the season before planting, not the week before. Size the application with the lime requirement calculator using buffer pH rather than water pH, and cross check with the soil pH adjuster calculator.
Choose dolomitic lime if magnesium is also low and calcitic lime if magnesium is adequate, since excess magnesium degrades soil structure.
For sodic or high sodium soils, gypsum displaces sodium without raising pH. Calculate the rate with the gypsum application calculator.
Building Organic Matter
Target above 3 percent organic matter. Below 2 percent, garlic struggles with water holding, nutrient buffering and the loose structure bulbs need to expand into.
Measure where you are starting from with the soil organic matter calculator and treat improvement as a three season project, not a one season fix.
Compost
Apply 15 to 25 tonnes per hectare of finished compost, incorporated 6 to 10 weeks before planting.
Two rules matter enormously here. First, it must be fully finished. Raw or half finished compost immobilises nitrogen exactly when your crop needs it and attracts seedcorn maggot. Check your feedstock balance with the compost carbon to nitrogen ratio calculator and aim for a finished C to N ratio near 15 to 20 to 1.
Second, never use compost containing Allium waste from an unknown source. That is a classic route for white rot entering a clean farm.
Green Manures and Cover Crops
A cover crop ahead of garlic does four jobs: it builds organic matter, suppresses weeds, cycles nutrients and can actively suppress soilborne pathogens.
The best options for garlic rotations:
- Mustard and other brassicas release glucosinolates when macerated and incorporated, which suppresses several soilborne fungi and nematodes. Flail and incorporate at early flowering, then irrigate lightly to seal.
- Cereal rye produces enormous biomass and strong weed suppression, but it demands nitrogen to break down, so allow extra time.
- Legume mixes such as vetch or clover fix nitrogen. Reduce your applied nitrogen budget by 40 to 80 kg per hectare accordingly, or you will overshoot and get soft, poorly storing bulbs.
Estimate what you will actually get back with the green manure biomass calculator and set your rate with the cover crop seeding rate calculator.
Critical timing note: incorporate cover crop residues at least three to four weeks before planting garlic. UC IPM is explicit that tilling in green residue immediately before planting attracts seedcorn maggot and interferes with the shallow, precise placement that Alliums need. Their integrated weed management guidance is worth reading in full on this point.
Managing Compaction
Garlic roots are weak. A plough pan at 20 to 30 cm will cap your yield no matter how good your fertility programme is.
Find it first. Push a penetrometer or a simple steel rod through the profile at several points and note the depth at which resistance jumps. Then dig a pit and look at root behaviour in the previous crop, since roots turning sideways at a consistent depth is the clearest evidence there is.
Fix it with a subsoiler or deep ripper running 5 cm below the pan, working when the soil is dry enough to shatter rather than smear. Then prevent it returning: controlled traffic lanes, correct tyre pressures, and a firm rule against working wet ground.
Building the Nutrient Budget
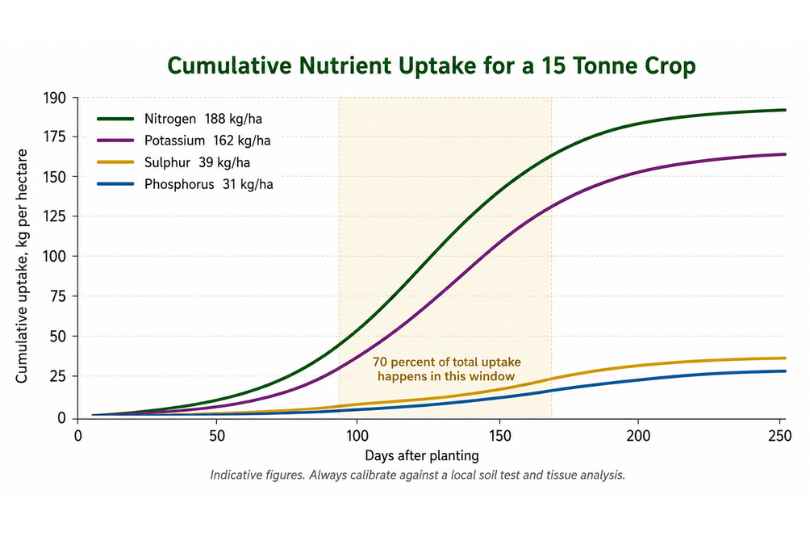
Figure 8. Cumulative nutrient uptake for a 15 tonne per hectare garlic crop.
A 15 tonne per hectare crop removes roughly the following, though local figures should always override these:
| Nutrient | Approximate uptake | Notes |
| Nitrogen | 150 to 200 kg per hectare | Split heavily, stop before late fill |
| Phosphorus as P2O5 | 60 to 90 kg per hectare | Place at planting, poorly mobile |
| Potassium as K2O | 150 to 200 kg per hectare | Drives bulb size and storage quality |
| Sulphur | 30 to 50 kg per hectare | Directly linked to pungency and allicin |
| Calcium | 40 to 60 kg per hectare | Wrapper and cell wall integrity |
| Magnesium | 15 to 25 kg per hectare | Chlorophyll and photosynthesis |
Build the actual programme with the NPK fertiliser dosage calculator, then check the nitrogen side separately with the nitrogen balance calculator so credits from manure, compost and legume residues are actually accounted for rather than ignored.
Nitrogen
Nitrogen is the nutrient growers most often get wrong in both directions.
Too little and you get too few leaves before bulb initiation, which permanently caps bulb size. Too much, especially late, and you get lush foliage, delayed maturity, thick necks that never seal properly, soft bulbs and poor storage.
The professional pattern is 25 to 30 percent at or before planting, then 25 to 30 percent at the resumption of spring growth, then 25 percent at early bulb initiation, then the balance in early bulb fill, and then nothing. Stop nitrogen once bulbs are actively filling.
Set urea rates with the urea application rate calculator and remember that surface applied urea can lose 20 to 40 percent to volatilisation if it is not incorporated or watered in within a day or two.
Phosphorus
Phosphorus barely moves in soil and garlic roots barely move either. That combination means placement beats rate. Band phosphorus 4 to 5 cm below and 2 to 3 cm to the side of the row at planting rather than broadcasting it.
Early root development and bulb initiation both depend on phosphorus supply. Size it with the phosphorus application calculator, and if you are using DAP as your source, the DAP fertiliser calculator will keep you from double counting the nitrogen it also supplies.
Potassium
Potassium is the bulb size and storage quality nutrient, and it is chronically underapplied in garlic. It regulates water movement, thickens cell walls, and improves post harvest firmness and shelf life.
Apply 40 to 50 percent before planting and the balance through bulb initiation and fill. Use sulphate of potash rather than muriate of potash where you can afford it, since it supplies sulphur and avoids the chloride load. Calculate with the potash application calculator.
Sulphur
Sulphur is not optional in garlic. It builds the organosulphur compounds that create pungency, aroma and allicin content, which are the traits your buyers are actually paying for.
Apply 30 to 50 kg per hectare, preferably as sulphate which is immediately available, rather than elemental sulphur which needs microbial oxidation and warm soil.
Sulphur deficiency shows as uniform pale yellowing of the youngest leaves. Nitrogen deficiency shows on the oldest leaves first. That difference is how you tell them apart in the field.
Micronutrients
Three matter most for garlic.
Zinc deficiency is common in high pH and high phosphorus soils and causes stunting and interveinal yellowing. Boron supports cell wall formation and bulb integrity, but the margin between deficient and toxic is narrow, so never guess a boron rate. Manganese locks up above pH 7 and shows as interveinal chlorosis on younger leaves.
Apply from a tissue test, not a hunch. Use the micronutrient application calculator for soil applications and the foliar spray concentration calculator for in season corrections.
Bed Formation and Final Tilth
Aim for a firm, level bed with a fine but not powdered surface. Over cultivating destroys structure and creates crusting, which garlic shoots struggle to push through.
The sequence that works: primary tillage or subsoiling to break pans, incorporate lime and compost, grow and incorporate the cover crop, allow three to four weeks for residue breakdown, form beds, apply and incorporate base fertility, lay drip tape, then plant.
Form beds 5 to 10 days before planting so they settle. Planting into freshly formed fluffy beds leads to cloves sinking and uneven emergence.
Sourcing and Preparing Seed Stock
Seed is your single largest variable cost and your single largest disease risk. Treat the procurement decision with the seriousness it deserves.
How Much Seed You Actually Need
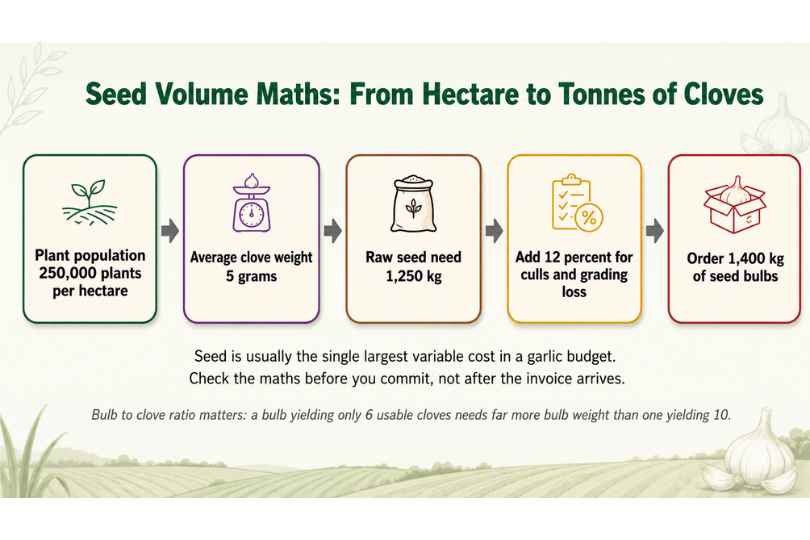
Figure 9. Working from target plant population to the tonnage of seed bulbs you need to order.
Work the maths in this order.
Start with target plant population, say 280,000 plants per hectare. Multiply by average clove weight, say 5 grams, giving 1,400 kg of cloves. Then divide by the clove recovery percentage of your seed bulbs, because a bulb is not 100 percent usable cloves. Typical recovery after removing the small inner cloves and damaged material is 80 to 88 percent, so 1,400 divided by 0.85 gives about 1,650 kg of seed bulbs. Add a further 5 percent for grading loss and handling.
That is roughly 1.7 tonnes of seed bulbs per hectare. At 20 hectares you are buying 34 tonnes. This is why seed planning starts a year ahead.
Run your own version with the seed rate calculator and confirm your target population with the plant population density calculator.
Certified Seed Versus Saved Seed
Certified or virus tested seed costs two to four times more than saving your own. It is usually still the right decision for at least part of your area.
UC IPM’s guidance on garlic mosaic is blunt on the point: virus free stocks produced from meristem tip culture and multiplied away from commercial garlic can deliver substantially higher yields. Virus load accumulates invisibly across generations of saved seed, and growers routinely attribute the resulting slow decline to weather or soil rather than to their own seed line.
The pragmatic commercial strategy is a three tier seed system:
- Buy a small quantity of certified, virus tested nuclear stock every year.
- Multiply it in an isolated, clean block with no Allium history and rigorous roguing.
- Plant your commercial area from the previous year’s multiplication block.
That way you refresh your genetics continuously without buying certified seed for the whole farm.
The Hidden Cost of Virus Load
Garlic carries several viruses, commonly in complexes rather than singly, spread by aphids and mites and carried permanently in the clove. There is no cure. An infected plant is infected for life and every clove it produces is infected too.
The symptoms are undramatic and that is the danger: mild mosaic or streaking, slight stunting, and a yield decline of 20 to 50 percent that arrives slowly enough to look like bad luck.
Control is entirely preventive. Start clean, rogue symptomatic plants, control aphids and mites in seed blocks, isolate seed multiplication from commercial production, and refresh nuclear stock on a fixed cycle.
Cracking and Grading
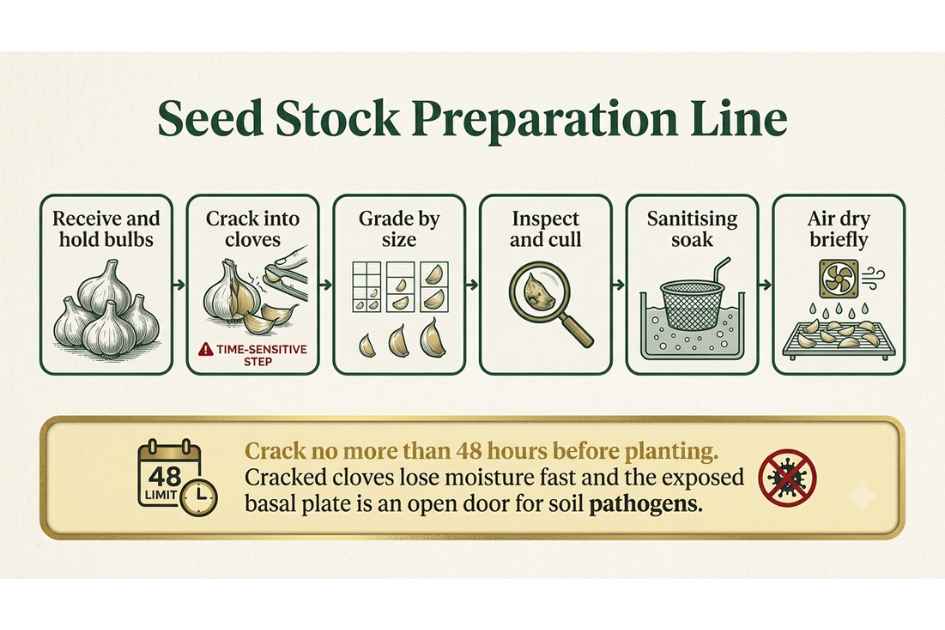
Figure 10. The seed preparation line, from receiving bulbs to cloves ready for the planter.
Cracking is separating bulbs into individual cloves. The timing rule is simple and frequently broken: crack no more than 48 hours before planting. A cracked clove has an exposed basal plate, loses moisture quickly, and is wide open to soil pathogens.
Grade every clove lot into at least three size bands and plant each band in its own block. This single practice does more for crop uniformity than anything else you can do at planting.
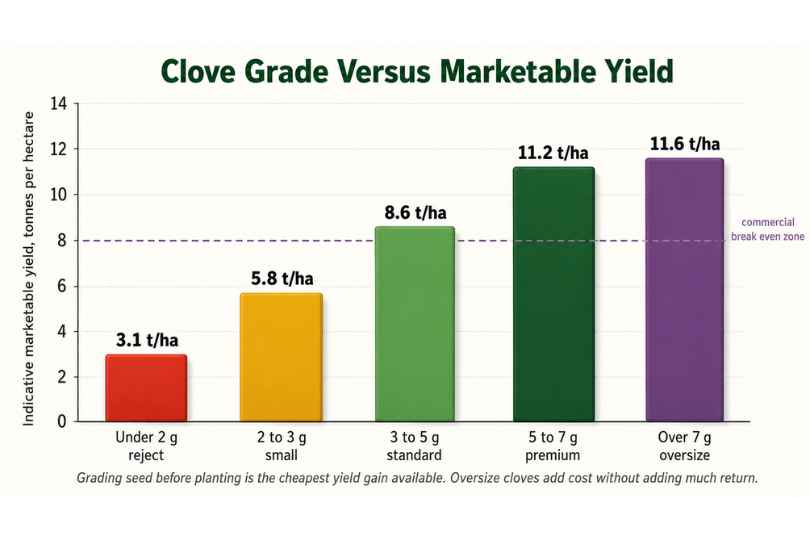
Figure 11. Clove grade versus achievable marketable yield.
The bands that work commercially: above 6 grams for your premium and seed multiplication blocks, 4 to 6 grams as your main commercial planting, 2.5 to 4 grams for the edges of the field or a second grade block, and below 2.5 grams rejected entirely. Small cloves do not catch up. They produce small bulbs, occupy full spacing, and drag your average down.
Discard any clove with a soft or discoloured basal plate, visible mould, mechanical damage, or an unusual shape, and discard the tiny inner cloves of softneck bulbs completely.
Seed Treatment and Sanitation
A pre plant treatment reduces the load of surface borne fungi and mites. Practices vary widely by region and legal status, so verify what is permitted where you farm before adopting any protocol.
Common approaches include a short soak in a permitted sanitiser or hydrogen peroxide solution, a registered fungicide seed treatment, and biological treatments based on Trichoderma or Bacillus species. Hot water treatment is used in some systems against nematodes and mites but the temperature and duration window is narrow and getting it wrong damages the seed, so it should only be attempted with locally validated protocols.
Whatever you use, dry cloves in shade with good airflow before planting. Planting wet cloves invites rot.
For biological products, work out your actual field rate with the biofertiliser application calculator.
Building Your Own Seed Multiplication Block
An on farm seed block should be treated as a different crop with different rules: an isolated field with no Allium history, wider spacing to maximise bulb and clove size, higher fertility, aggressive roguing of any off type or symptomatic plant, separate equipment or thorough sanitation between blocks, and harvest and curing kept entirely separate from the commercial crop.
Size it at roughly 12 to 15 percent of your commercial area, since garlic multiplies at only about six to ten times per season.
Bulbil Multiplication for Hardnecks
Hardneck scapes carry bulbils, and those bulbils are a genuinely useful tool. They carry far lower virus loads than cloves, which effectively cleans up a seed line over time, and one scape can yield 50 to 100 bulbils.
The catch is time. Bulbils take two to three seasons to reach plantable clove size. Year one gives you rounds, year two gives you small bulbs, year three gives you full size seed stock. Run a small bulbil block continuously as a rolling seed renewal system and the time cost stops mattering. ## Planting the Crop
Everything so far has been preparation. Planting is where those decisions become irreversible.
Getting the Planting Date Right
Quick answer: plant so that cloves develop a strong root system and reach 4 to 8 cm of top growth before soil temperature drops below about 4 degrees Celsius, which in most temperate regions means 4 to 6 weeks before your first hard frost.
The plant needs enough autumn warmth to root out, then a full winter of cold for vernalization, then maximum leaf area before day length triggers bulbing.
Practical anchors:
- Soil temperature at 10 cm should be 10 to 16 degrees Celsius at planting. Above 20 and cloves may sprout too vigorously and burn reserves. Below 5 and rooting stalls.
- First frost date is your reference point. Count back four to six weeks.
- Autumn rainfall matters. Planting into a soil you cannot then irrigate, ahead of a dry autumn, gives you patchy rooting.
Get your local dates with the frost date calculator and build the full season schedule with the crop calendar generator and the planting date to maturity calculator.
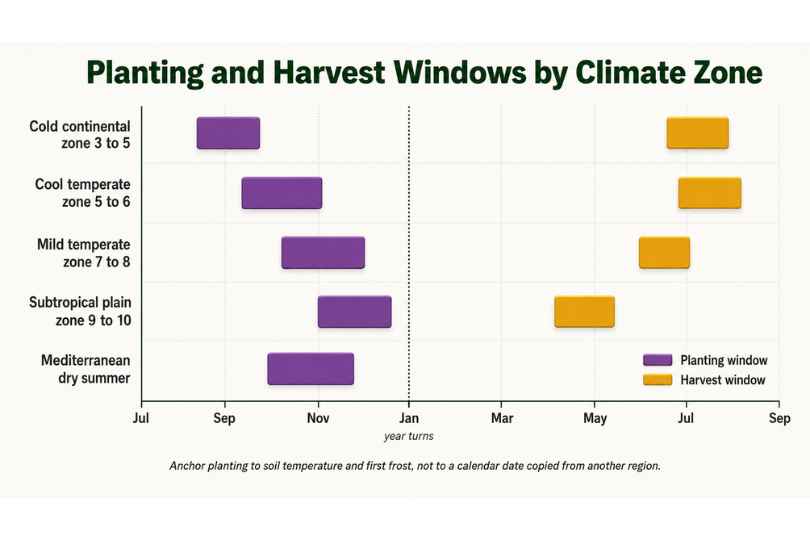
Figure 12. Indicative planting and harvest windows across climate zones.
Spring planting is a fallback, not a strategy. Where winters are too severe for overwintering, or where autumn planting is genuinely impossible, spring planted garlic will produce a crop, but expect 30 to 50 percent lower yield and a high proportion of rounds unless the seed has been thoroughly pre chilled.
Plant Population and Spacing
Population is a direct trade off between total yield and individual bulb size, and the right answer depends entirely on your market.
| Target market | Plants per hectare | In row spacing | Effect |
| Maximum tonnage, processing | 320,000 to 400,000 | 8 to 10 cm | High yield, smaller average bulb |
| Balanced commercial | 250,000 to 320,000 | 10 to 12 cm | The standard commercial compromise |
| Premium large bulb, seed stock | 180,000 to 250,000 | 13 to 16 cm | Largest bulbs, lower total tonnage |
Row spacing generally runs 25 to 30 cm for machine access, tightening to 15 to 20 cm in intensive hand managed systems.
Calculating Plant Population
The arithmetic is straightforward but worth doing properly rather than approximating.
Plants per hectare equals 10,000 divided by the product of row spacing in metres and in row spacing in metres, then adjusted for the proportion of the field actually in beds rather than wheel tracks.
Take a four row bed on 2.0 metre centres with rows at 0.28 m and cloves at 0.11 m. Each bed carries four rows across 2.0 m of ground, so effective row spacing across the field is 0.5 m. That gives 10,000 divided by 0.5 times 0.11, which is about 181,000. Tighten in row spacing to 0.09 m and add a fifth row and you climb toward 250,000.
Rather than doing this by hand for every configuration, use the row and seed spacing calculator alongside the plant population density calculator.
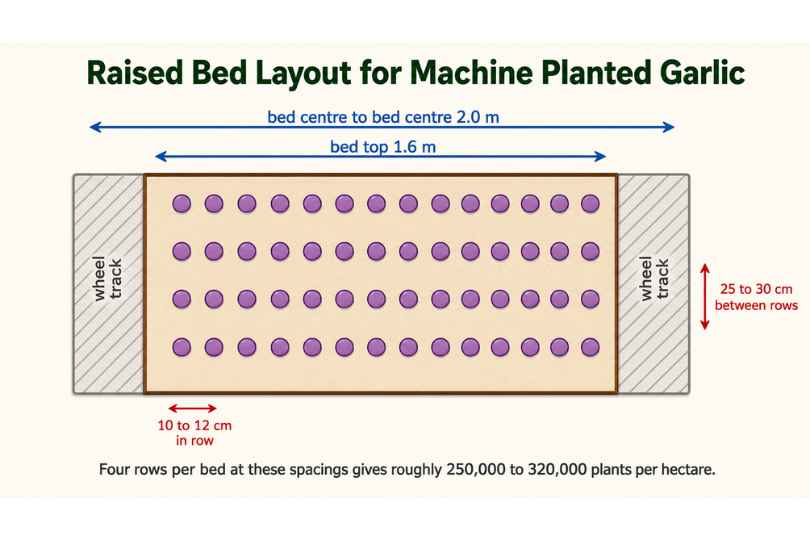
Figure 13. A four row raised bed layout dimensioned for machine planting and harvest.
Depth and Orientation
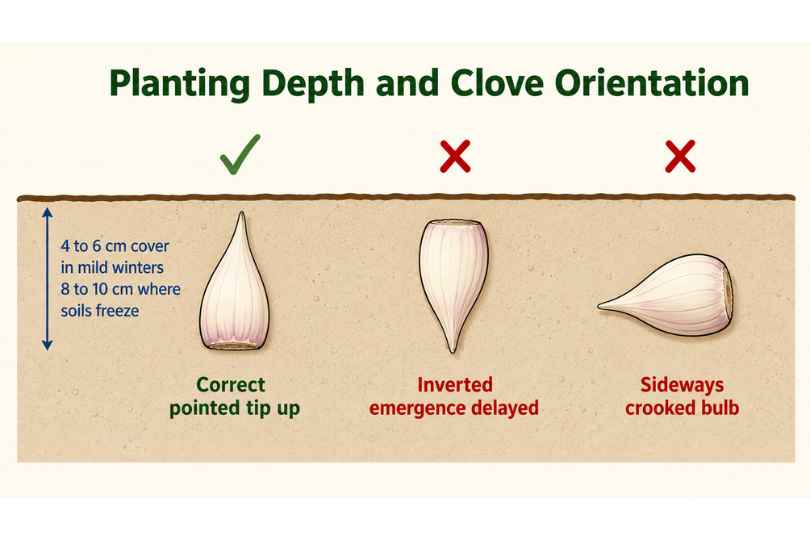
Figure 14. Planting depth and clove orientation, and what each error costs you.
Depth is measured as soil cover above the tip of the clove, not from the base. In mild winter regions, 4 to 6 cm is right. Where soils freeze hard, go to 8 to 10 cm. In very light sandy soil, add a further 2 cm.
Too shallow and cloves heave out during freeze and thaw cycles, dry out, and produce shallow bulbs that green at the shoulder. Too deep and emergence is delayed, energy is wasted, and lifting becomes harder.
Orientation matters more than most mechanised growers admit. Pointed tip up gives the fastest, straightest emergence. Inverted cloves lose several days and often produce bent, misshapen bulbs. Sideways cloves produce crooked bulbs that grade down.
Hand planting achieves near perfect orientation and is why small scale crops often look so uniform. Semi automatic planters, where an operator places each clove in a cup, achieve roughly 90 to 95 percent correct orientation. Fully automatic clove planters vary widely, from about 60 percent on older machines to over 90 percent on modern orientation systems.
The honest trade off: at 5 hectares, hand or semi automatic planting is achievable and gives better uniformity. At 30 hectares it is not, and you accept a small orientation penalty in exchange for actually getting the crop planted inside the window.
Bed Design for Machinery
Design your beds around your widest machine, not your narrowest. Wheel track width, bed top width, bed height and headland turning space should all be settled before the first bed former enters the field, because you will live with that geometry for the whole season.
A workable standard for mid scale operations: beds on 2.0 metre centres, 1.6 metre bed tops, 20 to 25 cm bed height, four to five rows per bed, and 8 to 10 metre headlands.
Controlled traffic, where every machine runs the same wheel lines every pass, protects your bed structure from compaction across the whole season. It costs nothing except discipline.
Planting Equipment by Scale
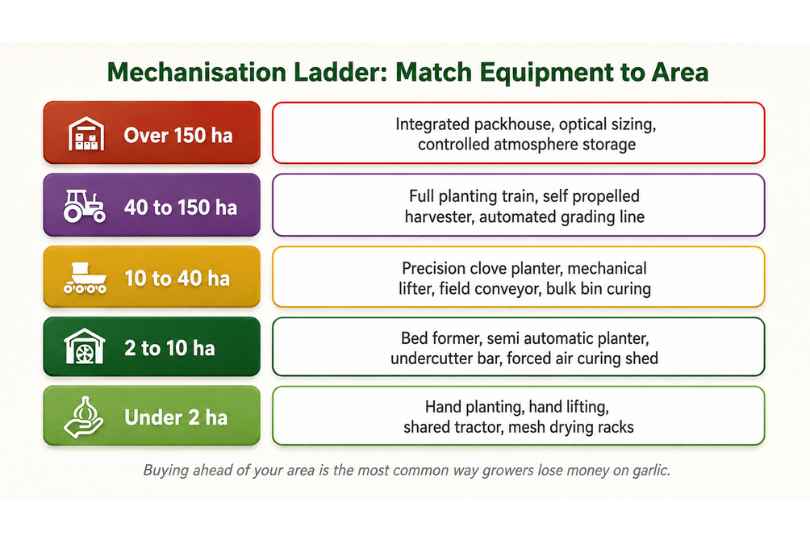
Figure 15. Matching equipment investment to planted area.
Under 2 hectares: hand planting into pre marked beds or dibbled holes. Slow, roughly 60 to 100 labour hours per hectare, but excellent placement.
2 to 10 hectares: semi automatic planters where operators ride the machine and drop cloves into cups. Typical throughput is 0.4 to 0.8 hectares per day with a crew of four to six.
10 to 40 hectares: fully automatic clove planters with orientation mechanisms, planting 2 to 4 hectares per day. Capital cost is significant, so check payback with the farm equipment ROI calculator before buying rather than after.
Over 40 hectares: integrated planting trains that form the bed, place fertiliser, lay drip tape, plant and apply pre emergence herbicide in a single pass.
Factor running costs honestly using the tractor fuel and operating cost calculator.
Mulching Decisions
Mulch suppresses weeds, moderates soil temperature, conserves moisture and prevents winter heaving. It also costs money and complicates mechanisation.
Straw at 8 to 12 cm depth is the traditional choice in cold regions. It is cheap where straw is local and it genuinely reduces winter losses. Watch for two problems: straw carrying viable weed seed, and straw creating slug and rodent habitat.
Plastic mulch gives excellent weed control and earlier maturity but requires a planting hole for every clove, complicates fertigation, and creates a disposal cost and an environmental question.
No mulch is the norm in mild winter, mechanised systems where herbicide and cultivation carry the weed programme.
Work out the volume and cost before committing with the mulch volume calculator.
Irrigation Management
If there is one section of this guide that separates 8 tonne crops from 16 tonne crops, this is it.
How Garlic Uses Water
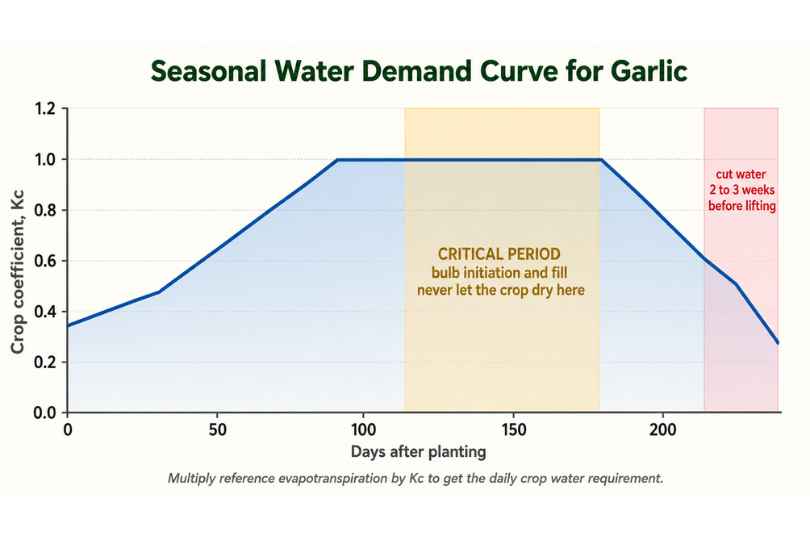
Figure 16. Seasonal water demand curve for garlic, expressed as crop coefficient.
Garlic has a shallow, unbranched root system concentrated in the top 30 to 45 cm. It cannot buffer itself against dry spells by rooting deeper. Season long water requirement is typically 450 to 650 mm, but the distribution matters far more than the total.
The four phases work like this.
Establishment, roughly the first month, needs consistent light moisture for rooting. Overwatering here rots cloves.
Vegetative growth through winter and early spring often runs on rainfall alone in temperate regions. Do not irrigate cold saturated soil.
Bulb initiation and fill, from around day 115 to day 175, is the critical period. Demand peaks at 5 to 7 mm per day. Water stress here is the single most common cause of small bulbs, and it cannot be corrected afterwards.
Maturation requires the opposite. Withhold water two to three weeks before harvest so bulbs firm up, wrappers dry and the neck seals.
Calculate your local requirement with the crop water requirement calculator driven by the evapotranspiration calculator.
Choosing an Irrigation System
Drip
Drip is the professional standard for commercial garlic and the reason is fertigation as much as water efficiency.
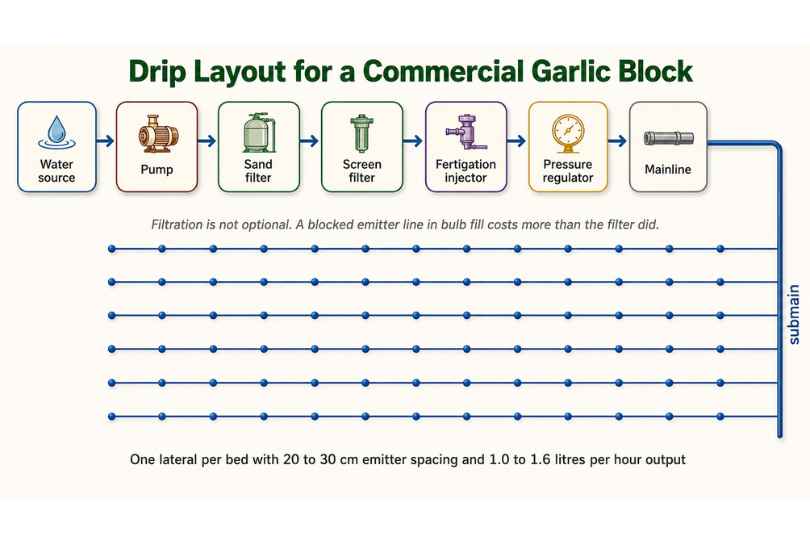
Figure 17. A drip layout for a commercial garlic block, from source through filtration to laterals.
Design targets that work: one lateral per two rows or one per row in intensive plantings, emitters at 20 to 30 cm spacing delivering 1.0 to 1.6 litres per hour, laterals placed 3 to 5 cm below the surface or on the surface under mulch, and run lengths kept short enough to hold uniformity above 90 percent.
Drip keeps foliage dry, which materially reduces downy mildew, rust and Botrytis pressure. It also delivers nutrients directly to a shallow root zone that cannot go looking for them.
Size the whole system with the drip irrigation system designer.
Sprinkler
Overhead sprinkler or centre pivot is common in large industrial garlic regions and works well where capital and water are both available.
Advantages: excellent uniformity when properly designed, useful for frost protection and for germinating pre emergence herbicides, and easy to move between crops.
Disadvantages: it wets foliage, which raises foliar disease pressure, and it loses water to evaporation and wind drift. If you irrigate overhead, do it early in the day so leaves dry before evening.
Design with the sprinkler irrigation calculator.
Furrow and Flood
Still widely used and entirely viable where water is cheap and land is level, though efficiency is much lower and uniformity is difficult across long runs.
If you are running surface irrigation, at least measure what you are applying with the flood irrigation water calculator and the canal water measurement calculator. You cannot manage what you never measure.
Scheduling With Data
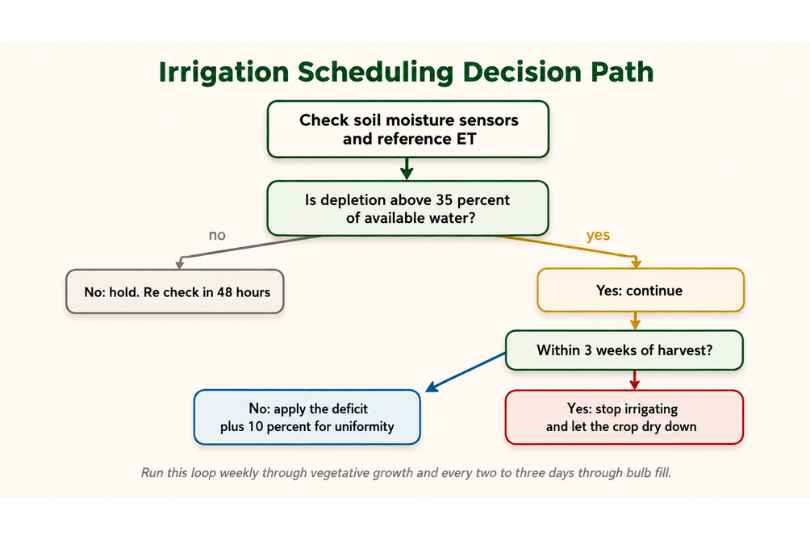
Figure 18. A simple decision path for irrigation scheduling through the season.
Stop irrigating on a fixed weekly schedule and start irrigating on measured deficit.
The workable method combines soil moisture sensors at 15 cm and 30 cm with a running water balance driven by reference evapotranspiration and your crop coefficient. Irrigate when depletion reaches roughly 30 to 35 percent of plant available water, and apply the deficit plus about 10 percent for distribution uniformity.
Track it with the soil moisture deficit calculator, and audit your season with the water use efficiency calculator so you know whether the money you spent on water actually turned into tonnes.
If you are on a constrained supply, the rainwater harvesting calculator is worth running before you build storage.
The Critical Bulbing Window
Say it again, because it is the most expensive thing in this guide: do not let the crop experience water stress during bulb initiation and early fill.
During those six to eight weeks, check soil moisture every two to three days. Irrigate little and often rather than heavily and occasionally, since a shallow root system cannot use a deep wetting front. Watch for early stress signals such as a greyish cast on the foliage or leaf tips beginning to fold, and act before you see them rather than after.
Cutting Water Before Harvest
Stop irrigating two to three weeks before the planned lift, or when roughly half the leaves have senesced.
This does four things. Bulbs firm up. Wrappers dry and tighten. The neck begins to seal, which is what allows storage. And soil dries enough for clean lifting.
Continuing to irrigate into maturity produces soft bulbs, stained wrappers, split skins and a crop that will not store. It is a genuinely difficult discipline for growers who have spent five months worrying about drought.
Water Quality and Filtration
Drip systems fail from the emitter backwards. Install both a sand or media filter and a screen or disc filter, monitor pressure differential across them, flush laterals on a schedule rather than when you notice a problem, and inject acid or chlorine as appropriate for your water chemistry and local regulations.
A blocked lateral discovered during bulb fill costs far more than the filter would have.
In Season Nutrition
Your pre plant programme built the foundation. In season nutrition delivers the rest of the crop’s requirement exactly when the plant can use it.
Splitting the Programme Across Growth Stages
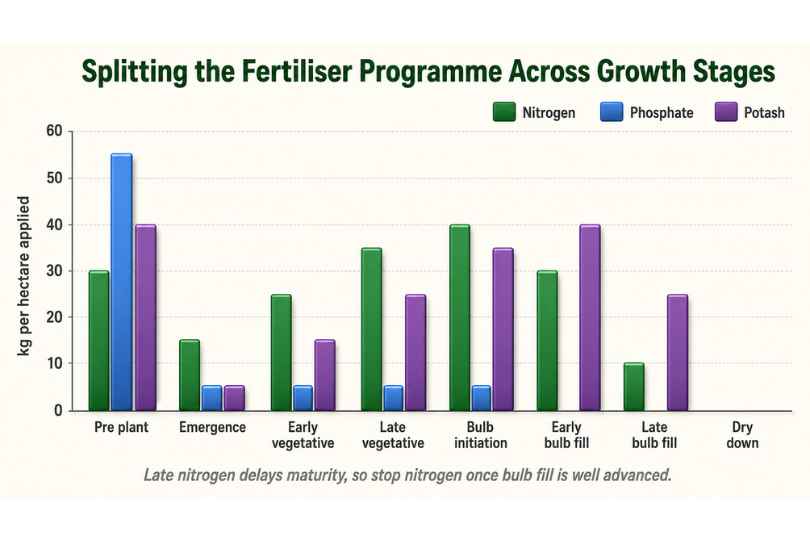
Figure 19. Splitting nitrogen, phosphate and potash across the growth stages.
The principle is simple. Match supply to the uptake curve in Figure 8. Roughly 70 percent of total nutrient uptake occurs between bulb initiation and mid fill, so that is where the majority of your in season nutrition belongs.
A workable programme for a 15 tonne target on a medium soil:
| Timing | Nitrogen | Phosphate | Potash | Notes |
| Pre plant base | 30 kg/ha | 55 kg/ha | 40 kg/ha | Band phosphate at planting |
| Emergence | 15 kg/ha | 5 kg/ha | 5 kg/ha | Light starter only |
| Early vegetative | 25 kg/ha | 5 kg/ha | 15 kg/ha | Resumption of spring growth |
| Late vegetative | 35 kg/ha | 5 kg/ha | 25 kg/ha | Build leaf area hard |
| Bulb initiation | 40 kg/ha | 5 kg/ha | 35 kg/ha | Peak demand begins |
| Early bulb fill | 30 kg/ha | 0 | 40 kg/ha | Last nitrogen of the season |
| Late bulb fill | 10 kg/ha | 0 | 25 kg/ha | Potash only in practice |
| Dry down | 0 | 0 | 0 | Nothing |
Adjust the totals to your own soil test rather than copying the table. Run it through the NPK dosage calculator and, if you are applying through drip, the fertigation calculator.
Fertigation Practice
Fertigation is the reason drip pays for itself twice.
Inject during the middle third of the irrigation run so the system is pressurised and stable first, then flushed clean afterwards. Keep concentration low and frequency high, typically weekly during peak demand, which suits garlic’s shallow roots far better than monthly slugs.
Watch compatibility. Calcium sources and phosphate or sulphate sources will precipitate in the line and block emitters. Run a jar test before mixing anything new.
Monitor electrical conductivity at the emitter, not just at the tank.
Foliar Feeding and Tissue Testing
Foliar feeding is a correction tool, not a programme. It cannot deliver the macronutrient volumes garlic needs, but it is fast and effective for micronutrients and for short term rescue.
Take tissue tests at three points: mid vegetative, bulb initiation, and early bulb fill. Sample the youngest fully expanded leaf, 30 to 40 leaves per block, and send them promptly.
Mix foliar sprays with the foliar spray concentration calculator, spray in the cool of early morning or evening, and always include an appropriate wetter, because garlic’s waxy upright leaves shed water aggressively.
Organic Nutrition Programmes
Organic systems face a timing problem more than a quantity problem. Nitrogen from organic sources mineralises on the soil’s schedule, not the crop’s.
The approach that works: build a large base of composted manure and cover crop residue, then top up in season with fast acting permitted sources such as blood meal, feather meal, fish hydrolysate or pelleted poultry manure applied ahead of demand rather than at demand.
Size your applications with the organic fertiliser calculator and, if you produce your own, the vermicompost production calculator. The wider organic farming calculator set covers most of the enterprise questions that come with certification.
Weed Management at Scale
Weed control is where garlic budgets are quietly destroyed. Growers plan for it, underestimate it, and then find themselves paying for emergency hand weeding at harvest prices.
Why Garlic Loses to Weeds
Garlic has three structural disadvantages, and UC IPM sets them out clearly. The crop is slow growing and shallow rooted. It is planted at high density, which limits mechanical cultivation. And its narrow upright leaves never close canopy, so light continues to reach the soil surface all season.
Add a growing season of eight to ten months, which allows several successive flushes of weeds, and the result is a crop that competes badly from emergence to harvest.
Uncontrolled weeds cost 40 to 80 percent of yield. This is not a marginal issue.
The Critical Weed Free Period
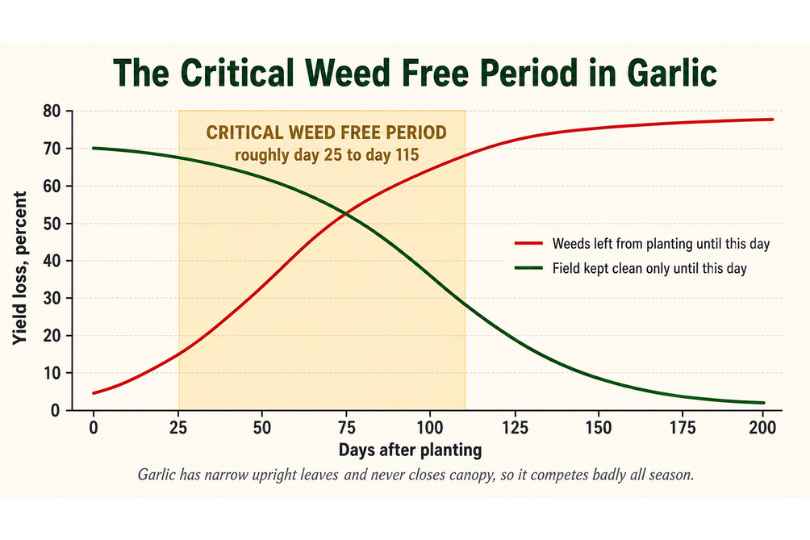
Figure 20. The critical weed free period in garlic.
Research across Allium crops consistently identifies a critical window, in garlic broadly from around day 25 to day 115 after planting, during which the field must be kept clean.
Weeds emerging before that window can be removed with limited yield penalty. Weeds emerging after it compete less because the crop is already established. Weeds present during it cause losses that no later intervention recovers.
Concentrate your budget, labour and attention there.
Building a Layered Programme
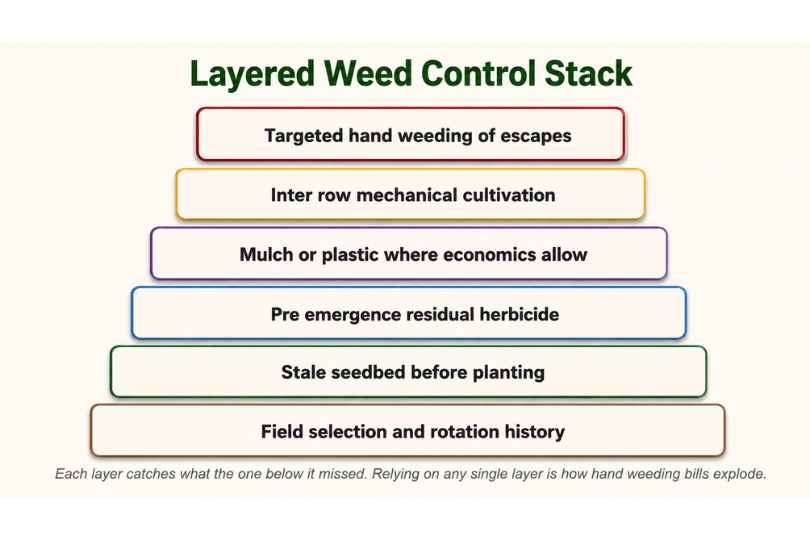
Figure 21. A layered weed control programme, where each tactic catches what the previous one missed.
No single tactic controls weeds in garlic. Stack them.
Stale Seedbed
Prepare beds two to four weeks before planting, irrigate lightly to germinate the surface weed seed bank, then kill that flush with shallow cultivation or a non selective herbicide. Critically, do not cultivate deeply afterwards, or you simply bring up a fresh seed bank.
A well executed stale seedbed can remove 50 to 70 percent of your first flush before the crop is even planted. It is the cheapest weed control available.
Pre emergence Chemistry
Registered pre emergence herbicides are the backbone of conventional garlic weed control, but the registered list is short and varies enormously by country.
Never assume a product registered in one jurisdiction is legal or safe in yours. Check the label, check your national registration, and check plantback restrictions from the previous crop. The UC IPM herbicide treatment table is a useful worked example of how these decisions are structured, though the specific products apply to California only.
Calculate rates properly with the herbicide application rate calculator and set your carrier volume with the spray volume calculator.
Mechanical Cultivation
Inter row cultivation works well between beds and between rows if your spacing allows it.
Keep it shallow, no more than 2 to 3 cm, because garlic roots are near the surface and root pruning costs yield. Cultivate when weeds are at the white thread stage, which is when they are easiest to kill and least competitive. Stop once bulbs begin to expand, since soil thrown against expanding bulbs causes staining and damage.
Finger weeders, brush weeders and torsion weeders handle in row weeds in the early crop. Camera guided cultivators are now viable at mid scale and dramatically reduce hand weeding cost.
Mulch
Straw or plastic mulch, discussed in the planting section, is also a primary weed control tool and in organic systems it is often the primary one.
Hand Weeding Economics
Hand weeding is the safety net and the budget killer. Plan for 60 to 150 labour hours per hectare in a conventional system and 200 to 400 in an organic system without plastic mulch.
Price it honestly with the farm labour cost calculator before the season, so that when you decide to skip a cultivation pass in March you are making that decision with the June invoice in front of you.
Resistance Management
Rotate herbicide modes of action across seasons, never across consecutive applications in the same season only. Combine chemical control with mechanical and cultural tactics. Control escapes before they set seed, because one season of seed return undoes three seasons of good management. And keep records of every application by block, since resistance is diagnosed from history rather than from a single failure. ## Pest and Disease Management
Garlic has relatively few pests compared with most horticultural crops. The ones it has, however, include several that can end a crop or end a field.
Building the IPM Framework
Integrated pest management is not a philosophy. It is a decision sequence, and it saves money.
- Prevent. Clean seed, rotation, resistant varieties, field hygiene.
- Monitor. Scout weekly with a written protocol and record counts.
- Threshold. Act on measured population levels, not on sightings.
- Intervene. Use the least disruptive effective option first.
- Evaluate. Assess results and feed them into next season’s plan.
Structure your decisions with the IPM decision support tool and set intervention points with the pest economic threshold calculator. The complete pest and disease control calculator set covers most of the operational maths.
Diseases That End Crops
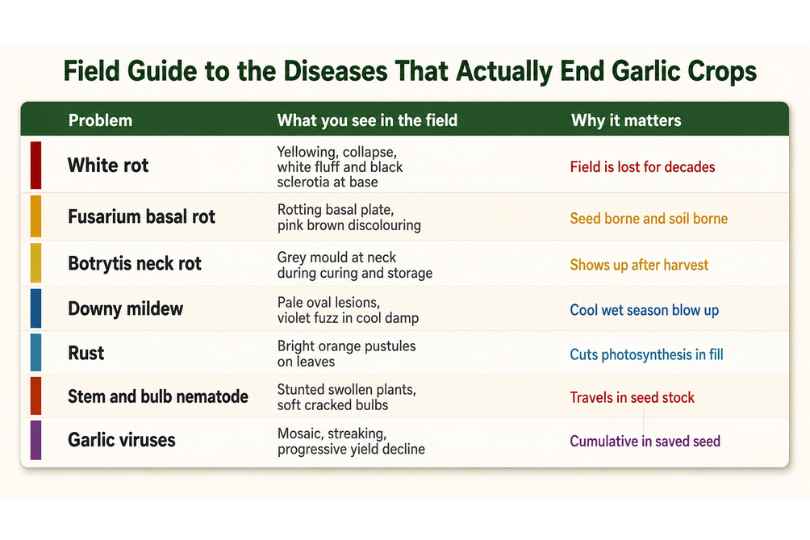
Figure 22. A field guide to the diseases that actually end garlic crops.
White Rot
This is the one. Stromatinia cepivora, formerly Sclerotium cepivorum, is the most serious garlic disease worldwide and it is effectively permanent.
The pathogen survives as sclerotia, tiny black resting bodies. The University of Maine Extension reports that an infested field can be unusable for Allium production for as long as 40 years even without a host crop, and that a single sclerotium per 20 pounds of soil is enough to cause measurable crop loss, with one to two per pound infecting every plant.
Sclerotia stay dormant until they detect sulphur compounds exuded by Allium roots, then germinate and infect the basal plate. Symptoms are leaf yellowing and wilting, then collapse, with white fluffy mycelium and black sclerotia at the base of the plant.
There is no cure and no reliable rescue treatment. Management is entirely about not introducing it.
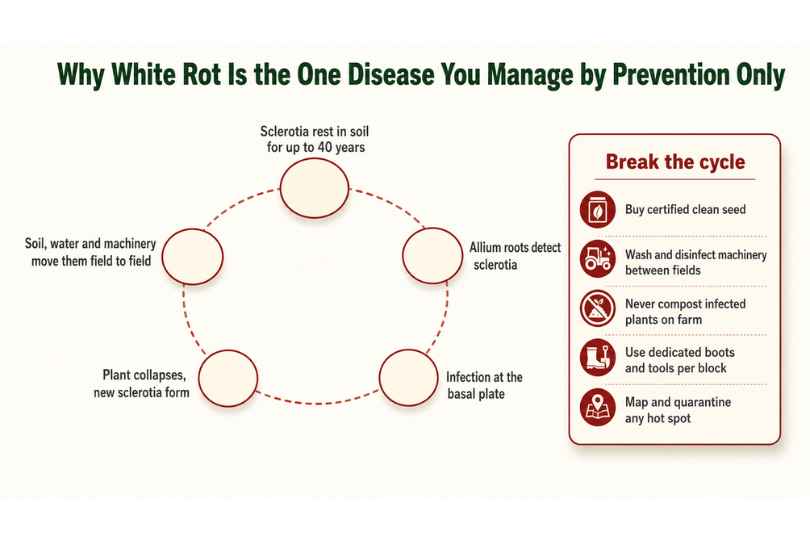
Figure 23. The white rot cycle and the points at which you can break it.
Practical biosecurity that actually works:
- Buy certified seed from suppliers who can document their white rot status.
- Wash all soil off every machine, implement and vehicle before it moves between fields.
- Use dedicated boots per block, or a disinfectant boot dip at every entry.
- Never compost infected plant material on farm. Remove it entirely.
- Map any suspected outbreak, quarantine that area, and stop planting Alliums there permanently.
- Do not use bulbs from an infested field as seed under any circumstances.
Research on germination stimulants, biofumigation and biological controls continues, and the ATTRA guidance on organic Allium production reviews the cultural and biological options. Solarization and biosolarization show promise, as do Bacillus based biologicals. None of them are a licence to plant garlic into an infested field.
If you suspect white rot, contact your extension service for confirmation immediately. The University of Maryland Extension white rot page has good identification photographs, including the important distinction between white rot and the unrelated white mould.
Fusarium Basal Rot
Fusarium oxysporum f. sp. cepae attacks the basal plate, producing a soft brown rot with white to pink fungal growth and roots that pull away easily.
Unlike white rot, this one you can manage. It is both seed borne and soil borne, favoured by warm soil and by any damage to the basal plate.
Control combines clean graded seed with careful cracking that does not bruise the plate, three to four year rotation, avoiding waterlogging, good drainage, and permitted seed treatments. Some varietal tolerance exists and is worth screening for in your variety trial.
Botrytis Neck Rot
Botrytis species infect through the neck, often during senescence or curing, and then reveal themselves in storage as grey mould and soft, watery tissue at the neck.
This is fundamentally a post harvest disease created by pre harvest decisions. Late nitrogen produces thick necks that never seal. Harvesting immature or wet. Slow curing in humid conditions. Mechanical damage at the neck.
Fix it upstream: stop nitrogen at early bulb fill, cut irrigation before harvest, harvest at correct maturity, and cure fast with strong airflow.
Downy Mildew
Peronospora destructor thrives in cool, wet, humid weather, producing pale oval lesions that develop a violet grey fuzz, followed by leaf collapse.
Manage with airflow, drip rather than overhead irrigation, wider spacing in high risk regions, removal of volunteer alliums, and preventive fungicide programmes timed on weather rather than on symptoms. Anticipate risk with the crop disease risk index calculator and plan applications with the weather based spray scheduler.
Rust
Puccinia allii produces bright orange pustules on leaves. It is favoured by mild temperatures and high humidity, and it hits hardest when it arrives during bulb fill, because every destroyed leaf is bulb weight you will not get.
Manage with resistant varieties where available, adequate but not excessive nitrogen, good airflow, removal of infected debris, and timely fungicide where thresholds justify it. Calculate rates with the fungicide application calculator.
Purple Blotch and Stemphylium Leaf Blight
These produce purple brown lesions with concentric rings, often entering through thrips feeding damage. That link is important: controlling thrips reduces purple blotch pressure directly.
Viruses
Covered in the seed section, and worth repeating here because virus is the most underestimated yield thief in garlic. The management is entirely in your seed system.
Insect and Nematode Pests
Onion Thrips
Thrips tabaci is the main insect pest of garlic worldwide. Adults and larvae rasp leaf tissue and feed on the sap, producing silvery streaking and bronzing. Heavy infestations cut photosynthesis, reduce bulb size, and open the door to purple blotch.
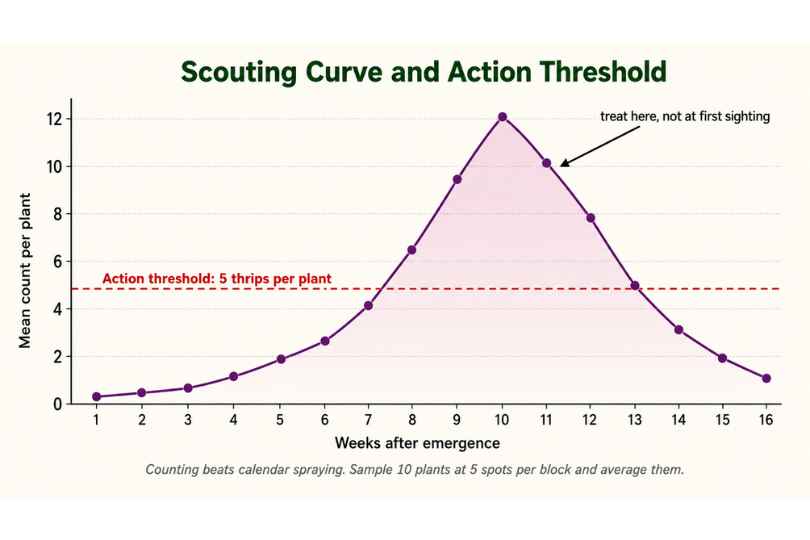
Figure 24. A thrips scouting curve with an action threshold.
Scout by examining 10 plants at each of 5 locations per block weekly, checking inside leaf sheaths where thrips hide. A common action threshold is around 5 thrips per plant, though local guidance varies and thresholds should be adjusted for crop stage and market.
Manage with rotation of insecticide modes of action to avoid resistance, which thrips develop rapidly, conservation of natural enemies including predatory mites and minute pirate bugs, removal of nearby weed and volunteer hosts, and overhead irrigation which physically disrupts populations where the disease trade off allows it.
Stem and Bulb Nematode
Ditylenchus dipsaci is the second most serious garlic problem after white rot, and like white rot it travels in seed.
Symptoms are stunted, swollen, distorted plants, bloated leaf bases, and bulbs that become soft, cracked and discoloured with a characteristic light brown ring in cross section.
Management is prevention led: certified nematode free seed, four to five year rotation with non host crops, hot water seed treatment where locally validated protocols exist, and strict sanitation of equipment. UC IPM’s nematode guidance for onion and garlic includes a practical sampling protocol, dividing fields into blocks of 5 to 20 hectares of similar cropping history and texture and compositing subsamples for laboratory assay.
Test before planting. Testing after symptoms appear tells you what you already lost.
Bulb Mites
Rhizoglyphus species feed on the basal plate, creating entry wounds for rot organisms. They are favoured by high organic matter and fresh, undecomposed residue, which is another reason to incorporate cover crops well ahead of planting.
Allium Leafminer
Phytomyza gymnostoma has spread rapidly through Europe and into North America. Adults create distinctive lines of white feeding punctures in a row down the leaf, and larvae mine into the bulb, opening it to bacterial and fungal rot.
Manage with fine mesh exclusion netting during flight periods where scale allows, crop rotation, destruction of crop residue, and correctly timed insecticide targeting the adult flight. The Rutgers ultra niche crops garlic factsheet covers leafminer alerts and monitoring in detail.
Maggots
Onion maggot and seedcorn maggot attack cloves and developing bulbs, and both are strongly associated with freshly incorporated green residue. The management is the same: incorporate cover crops and manure three to four weeks before planting rather than immediately before.
Scouting Protocol
Write it down and follow it.
Walk each block weekly on a fixed W or zigzag pattern. Stop at five points and inspect ten plants at each. Record thrips counts, foliar disease incidence and severity, plant stand gaps, weed species and pressure, and any patch pattern that suggests a soilborne problem. Photograph anything unfamiliar. Log the date, block, weather and scout name.
Ten seasons of scouting records is a genuine asset. It tells you when pressure typically arrives on your farm, which is far more useful than a regional average.
If losses occur, quantify them properly with the crop loss assessment calculator rather than estimating from the headland.
Spray Application Discipline
Calibration
An uncalibrated sprayer wastes money, causes crop damage and drives resistance. Calibrate at the start of every season and whenever you change nozzles, pressure or speed.
Check output per nozzle across the boom and replace any nozzle more than 10 percent off the mean. Confirm your ground speed over a measured run rather than trusting the tractor display. Set carrier volume for the canopy: garlic’s upright waxy leaves need adequate volume and a good wetter to achieve coverage.
Mix accurately with the pesticide dosage and mixing calculator and set volume with the spray volume calculator.
Pre harvest Intervals
Every product has a pre harvest interval and violating it can cost you your market, your certification and potentially your licence to trade.
Build your late season spray plan backwards from your expected harvest date using the pre harvest interval calculator. Record every application with product, rate, date, block and operator.
For biological and organic programmes, the biopesticide calculator helps with the different rate structures those products use.
Farm Biosecurity
Biosecurity is not glamorous and it is the cheapest insurance in garlic production.
Establish a wash down point at the farm entrance and use it. Restrict vehicle access to production blocks. Keep dedicated tools per block where soilborne disease is a risk. Work from your cleanest blocks to your most suspect ones, never the reverse. Require visitors to use clean or disposable boot covers. And keep a visitor log, because when something appears you will want to know who was in the field three weeks earlier.
Scape Management in Hardneck Blocks
If you are growing hardnecks, scaping is a compulsory operation with a saleable by product.
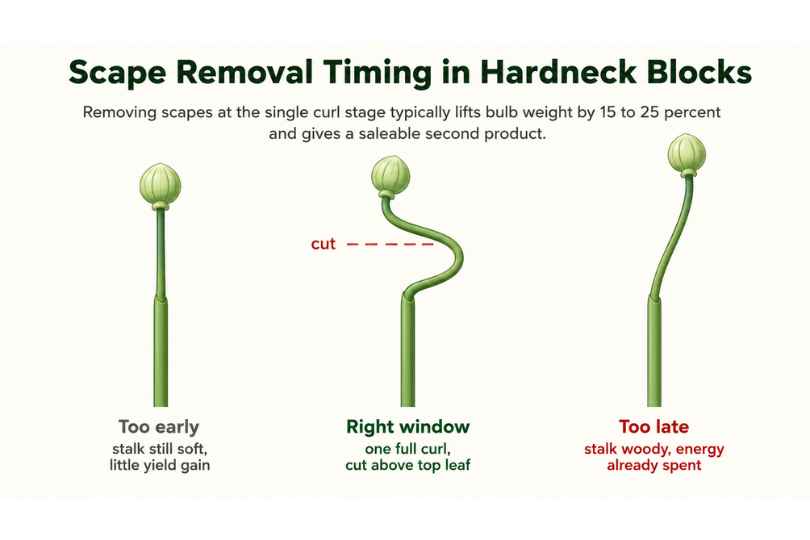
Figure 25. Scape removal timing, from too early through the correct window to too late.
Why and When to Remove Scapes
The scape is a flower stalk, and building it consumes carbohydrate that would otherwise go into the bulb. Removing it typically increases bulb weight by 15 to 25 percent, which at scale is a very large number.
Timing is the whole game. Remove the scape when it has completed roughly one full curl but before it straightens and hardens. Too early and the stalk is soft, snaps unevenly, and the yield benefit is small because little energy has been diverted yet. Too late and the plant has already spent the carbohydrate, so you get the labour cost without the yield gain.
Cut cleanly with a knife or snips just above the top leaf. Snapping by hand is faster but can tear the pseudostem and open a wound at the neck, which is exactly where Botrytis wants to enter.
Scapes do not all emerge at once. Expect to walk the block two or three times across seven to ten days.
Harvesting and Selling Scapes
Garlic scapes are a genuine second product and, per hour of labour, often one of the better returns on the farm.
They sell into restaurants, farmers markets and specialty retail, and they process well into pesto, pickles and frozen product. They hold two to three weeks refrigerated in a sealed bag at high humidity.
Budget 25 to 45 labour hours per hectare for scaping across the passes. Whether that is worth it depends entirely on whether you have a scape market. If you do not, you still have to scape, you just do not get paid for the product.
Harvesting
Harvest timing has a window of roughly seven to ten days. Miss it in either direction and you lose money.
Reading Maturity
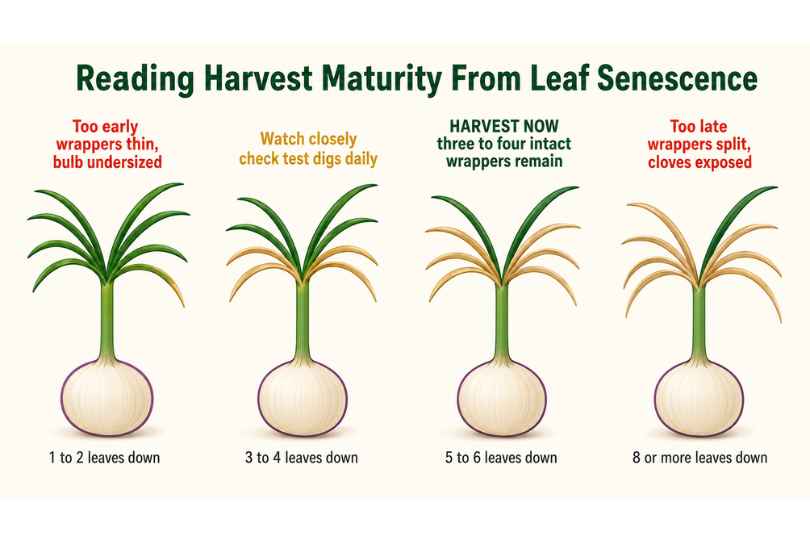
Figure 26. Reading harvest maturity from leaf senescence.
The standard indicator is leaf senescence, and it works because of the leaf to wrapper relationship described earlier.
Harvest when five to six lower leaves have browned and three to four upper leaves remain green. Those remaining green leaves correspond to the intact wrappers that will protect the bulb through curing, handling and storage.
Harvest too early and bulbs are undersized with thin wrappers that tear during handling. Harvest too late and wrappers have already broken down, bulbs split in the ground, cloves separate and become exposed, and storage life collapses. A late harvested crop can look enormous in the field and grade out disastrously.
Secondary indicators worth checking: the neck begins to soften, the outer wrappers feel papery, and on lifting a test plant the bulb is fully divided into distinct cloves with a clean shape.
Predict your window with the harvest time predictor and validate against test digs.
Test Digs
Begin test digging two to three weeks before you expect maturity, then every two to three days as you approach it.
Lift five to ten plants from different parts of each block, ideally including both the best and the weakest areas. Cut a bulb in half crosswise and check that cloves are fully differentiated and fill the wrappers. Count intact wrapper layers. Measure diameter and weight so you can forecast yield with the crop yield estimator.
Test digs are also your last chance to catch a problem such as nematode damage before you commit a harvest crew.
Lifting Methods by Scale
At small scale, garlic is loosened with a fork and pulled by hand. Slow, but gentle.
At mid scale, an undercutter bar runs 10 to 15 cm below the bulbs to sever roots and loosen the soil, and the crop is then pulled by hand and laid in windrows. This is the most common commercial approach worldwide and it balances throughput against damage.
At large scale, self propelled or trailed harvesters undercut, lift, remove soil on a conveyor, optionally top the foliage, and deliver into bulk bins or trailers. Throughput is high and bruising risk is also high, so machine setup and forward speed matter enormously.
Whatever the method, lift in dry soil. Wet soil sticks to bulbs, will not brush off, and dramatically slows curing.
Handling Rules in the Field
Garlic bruises invisibly. A bulb that looks perfect on the conveyor can show rot three weeks later in the store.
The rules are simple and constantly broken under harvest pressure: never drop bulbs more than about 30 cm, never throw them into bins, do not overfill containers, keep lifted bulbs out of direct sun since a few hours of strong sun causes sunscald and a green cast, and move the crop to curing within hours rather than days.
Do not wash bulbs. Ever. Water on the bulb before curing is an invitation to neck rot and it destroys the wrappers you spent nine months protecting. Brush soil off dry, after curing.
Harvest Logistics and Crew Planning
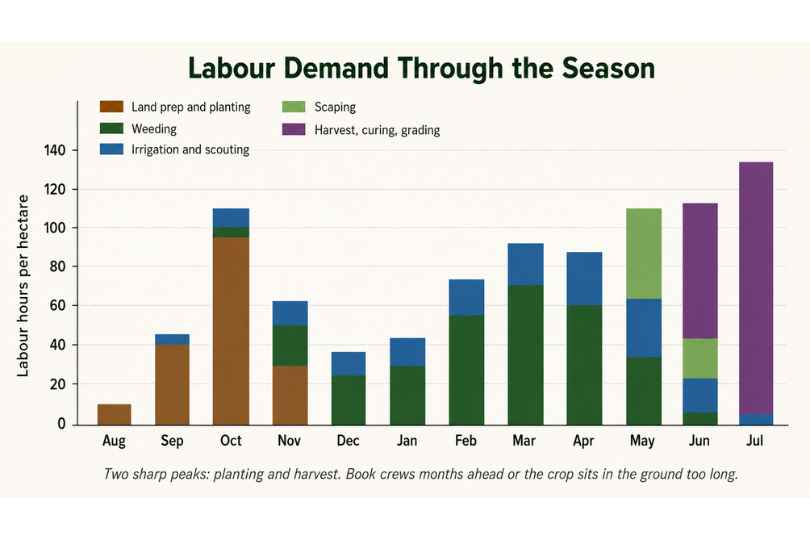
Figure 27. Labour demand across the season, showing the two sharp peaks.
Harvest is the sharpest labour peak of the year and the one where being unprepared costs most.
Plan backwards. Estimate tonnage per block. Calculate crew size for a hand pulled system at roughly 0.1 to 0.2 hectares per person per day. Book crews eight to twelve weeks ahead of the expected date, not the week before. Confirm curing capacity matches daily harvest throughput, because harvesting faster than you can cure is a very expensive mistake. Have contingency for a weather delay.
Cost it accurately with the farm labour cost calculator.
Curing and Drying
Curing is where growers lose crops they have already successfully grown. It deserves the same attention as planting.
What Curing Does
Curing dries the neck and the outer wrappers so that the bulb seals itself against pathogens and moisture loss. Four things happen: the neck closes, wrappers dry and tighten, surface moisture leaves the bulb, and dormancy sets in.
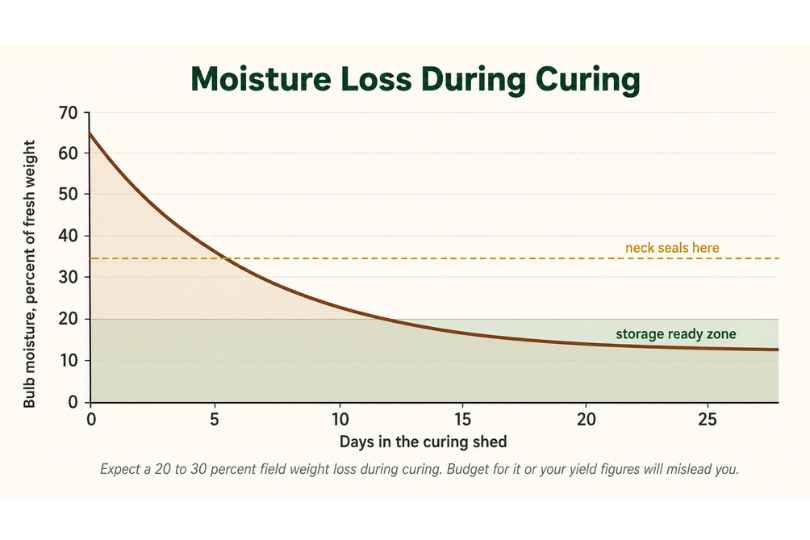
Figure 28. Moisture loss during curing.
Expect to lose 20 to 30 percent of field weight during curing. That is normal and unavoidable. Budget for it, because a grower who quotes 16 tonnes per hectare of field weight and sells 11.5 tonnes of cured product has not lost a crop, they have simply confused two different numbers.
Field Curing Versus Shed Curing
Field curing, where the crop is windrowed with the tops of one row shading the bulbs of the next, is cheap and works well in dry, warm, low humidity climates. It is unusable where rain, dew or humidity are likely, and sunscald is a constant risk.
Shed curing under cover with forced air is the commercial standard because it is controllable. It is not weather dependent, it is faster, and it produces a far more consistent result. It costs capital and power.
Forced Air Curing Design
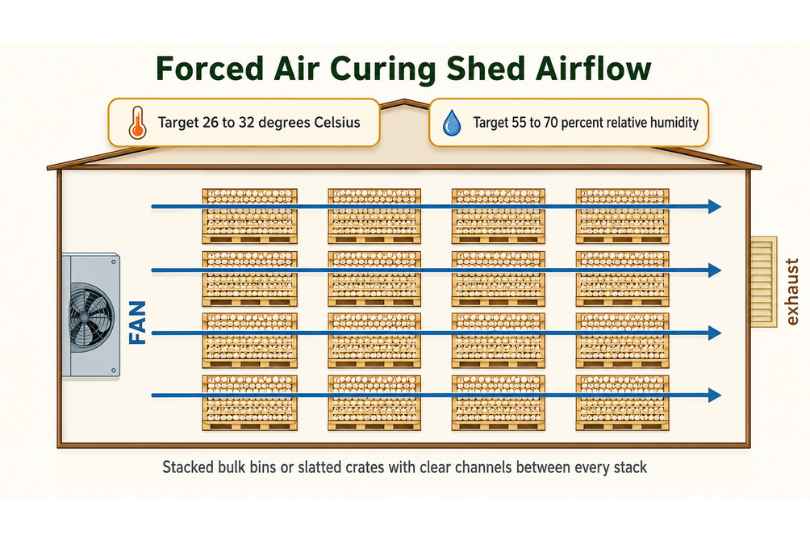
Figure 29. Forced air curing shed airflow and target conditions.
The design parameters that matter:
| Parameter | Target | Why |
| Air temperature | 26 to 32 degrees Celsius | Fast enough to seal, cool enough to avoid cooking |
| Relative humidity | 55 to 70 percent | Below 55 causes shrivel, above 75 stalls drying |
| Airflow | 0.1 to 0.2 cubic metres per second per cubic metre of product | Must move through the stack, not around it |
| Duration | 10 to 21 days | Depends on load, humidity and bulb size |
| Stack depth | Under 1.2 m in bulk bins | Deeper stacks trap moisture at the base |
The most common failure is not fan capacity. It is stack arrangement. Air follows the path of least resistance, so if there is a gap around your bins the air will travel through it and leave the centre of the stack wet. Block bypass routes and force air through the product.
Do not exceed about 35 degrees Celsius. High temperature curing damages wrappers, causes internal browning, and can cook the outer cloves.
Monitoring the Cure
Check daily rather than assuming.
The neck is the reference point. Curing is finished when the neck is fully dry, tight and no longer feels moist when pinched, when outer wrappers are papery and rustle, when roots are dry and brittle, and when the whole bulb feels firm rather than yielding.
If you have a moisture meter, use it. If not, sample bulbs and weigh them daily until weight loss levels off.
Common Curing Failures
| Problem | Cause | Prevention |
| Neck rot appearing in store | Incomplete cure, neck never sealed | Longer cure, more airflow, less late nitrogen |
| Shrivelled, light bulbs | Humidity too low or temperature too high | Hold 55 to 70 percent RH, cap at 32 degrees |
| Mould on wrappers | Stack too deep, air bypassing product | Reduce depth, block bypass, increase flow |
| Stained or soiled wrappers | Harvested in wet soil or washed | Lift in dry conditions, never wash |
| Green shoulders | Sun exposure before or during curing | Shade lifted bulbs, cure under cover |
Grading, Packing and Storage
Grading is where the value of the whole season is finally realised.
Trimming and Cleaning
Once cured, trim roots close to the basal plate without cutting into it, and cut tops 2 to 3 cm above the shoulder for loose sale or leave them on for braiding softnecks.
Remove only the outermost dirty wrapper. Every wrapper you take off shortens storage life, so the temptation to make bulbs look bright and white is directly at odds with shelf life. Clean dry, with a soft brush. Never with water.
Size Grading
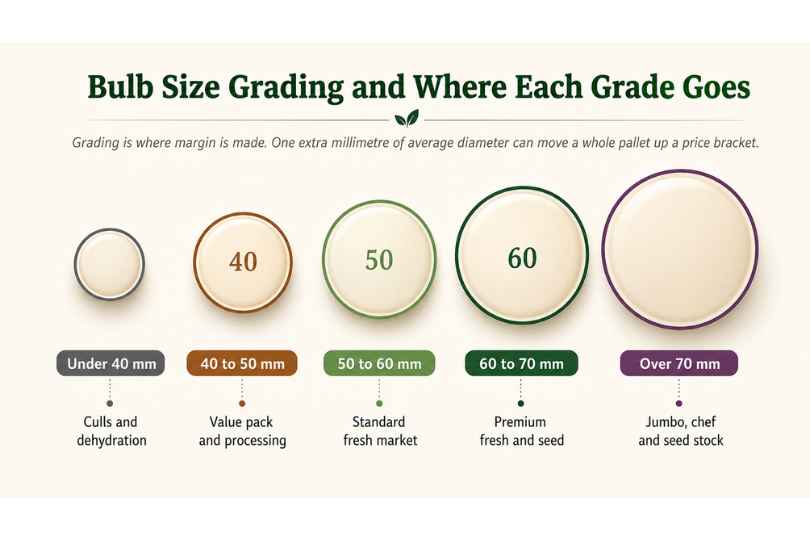
Figure 30. Bulb size grades and their typical market destinations.
Grade by diameter, which is the metric buyers use, and grade consistently. A pallet with mixed sizes is priced at the size of its worst bulbs.
Grading also feeds a decision you make once a year and live with for the next twelve months: which bulbs go back into the ground as seed.
Storage Conditions
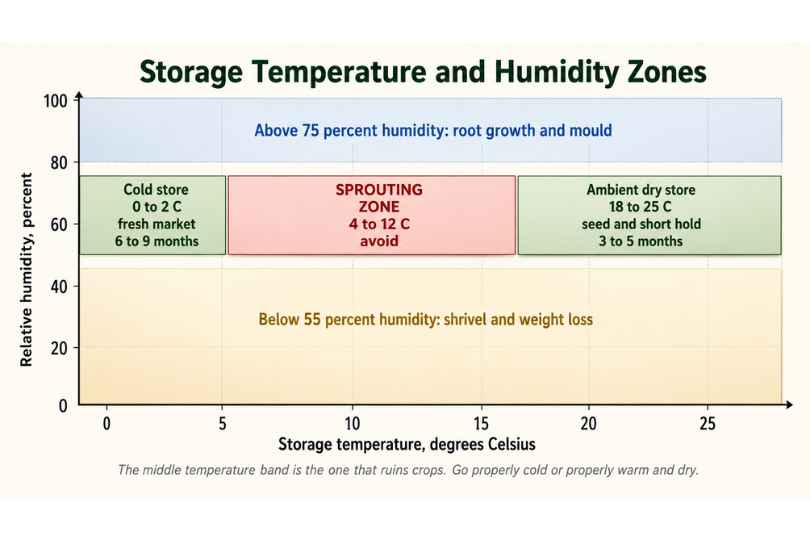
Figure 31. Storage temperature and humidity zones for garlic.
Garlic storage has a counterintuitive rule that catches out growers coming from other crops. There are two safe zones and a dangerous zone in the middle.
Cold storage at 0 to 2 degrees Celsius with 60 to 70 percent relative humidity holds fresh market garlic for six to nine months and holds dormancy well.
Ambient dry storage at 18 to 25 degrees Celsius with 60 to 70 percent relative humidity suits short to medium holding and seed stock, giving three to five months.
The danger zone is 4 to 12 degrees Celsius. This is precisely the range that breaks dormancy and triggers sprouting. Unheated sheds in a temperate autumn sit right in it. If you cannot get properly cold, stay properly warm and dry.
Humidity matters as much as temperature. Above 75 percent you get root growth and mould. Below 55 percent you get shrivel and weight loss. Airflow should be gentle but continuous.
Note that seed garlic and market garlic have different requirements. Seed benefits from a period of cool conditioning before planting, whereas market garlic should be held in deep dormancy as long as possible.
Storage Losses and Their Causes
Expect and plan for 5 to 15 percent loss over a six month storage period in a well run system. In a poorly run one it can exceed 30 percent.
| Loss type | Typical cause | Control |
| Sprouting | Temperature in the 4 to 12 degree zone | Move to true cold or true ambient |
| Shrivel and weight loss | Humidity below 55 percent | Raise RH, reduce airflow velocity |
| Neck rot | Incomplete curing | Fix curing, not storage |
| Blue and green mould | Wounds plus high humidity | Gentler handling, lower RH |
| Root growth | Humidity above 75 percent | Dehumidify, improve air movement |
Cold Chain and Cold Storage Economics
Cold storage is capital intensive and it is not automatically the right answer. Run the numbers before building.
The question is simple: does the price gain from holding the crop exceed the cost of holding it plus the losses incurred? Model it with the cold storage feasibility calculator and the crop storage cost calculator.
For many mid scale growers the better answer is a hybrid: sell the bulk of the crop in the two to three months after harvest, and hold only your premium grades for the late season price window.
Seed Selection for Next Season
Every season you make a genetic decision, whether you make it deliberately or by accident.
Selecting on the Grading Line
Select seed from your best performing block, not from the leftovers. That sentence contains the entire discipline, and it is broken constantly, because the temptation to sell your best bulbs and plant your worst is enormous in a tight cash flow year.
Select for large, well formed bulbs true to type, tight intact wrappers, no disease symptoms whatsoever, correct clove count for the variety, and firm basal plates.
Hold seed separately, labelled by block and lot, and store it under conditions appropriate for seed rather than market.
Managing Genetic Drift and Decline
Saved seed drifts. Virus accumulates, and selection pressure from your own choices gradually shifts the population.
Counter it with a fixed protocol: refresh nuclear stock from a certified source on a three to four year cycle, run a bulbil multiplication line for hardnecks, rogue aggressively in the seed block, and keep written records of which lot came from which block in which year.
Growers who do this hold yield steady for decades. Growers who do not watch a good line slowly become a mediocre one and blame the weather. ## The Economics of Large Scale Garlic
Garlic is a high input, high value crop with a long cash cycle. Understanding the money is as important as understanding the agronomy.
Cost of Production
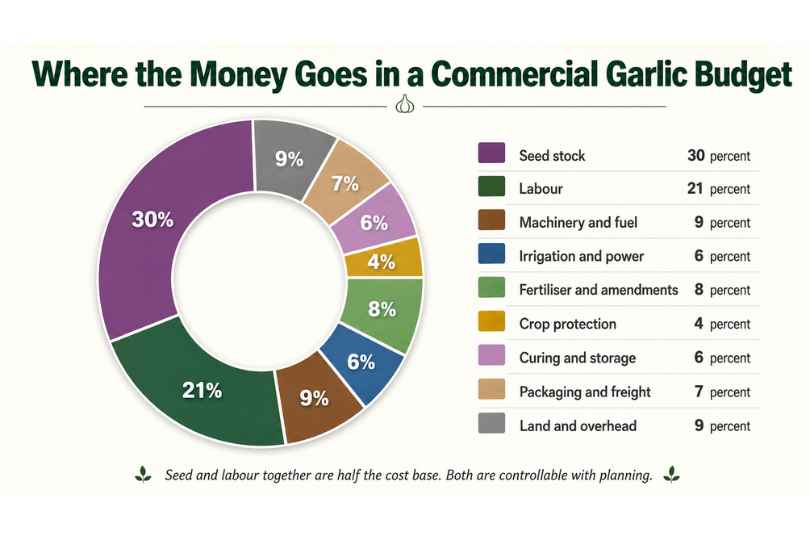
Figure 32. Where the money goes in a commercial garlic budget.
Absolute costs vary enormously by country, so the proportions matter more than the numbers.
| Cost category | Share of variable cost | Notes |
| Seed stock | 25 to 35 percent | The largest single line, and controllable |
| Labour | 18 to 25 percent | Planting, weeding, scaping, harvest, grading |
| Machinery and fuel | 8 to 12 percent | Rises with mechanisation, falls per hectare |
| Fertiliser and amendments | 7 to 10 percent | |
| Irrigation and power | 5 to 8 percent | |
| Curing and storage | 5 to 8 percent | Often underbudgeted |
| Packaging and freight | 6 to 9 percent | |
| Crop protection | 3 to 6 percent | |
| Land and overhead | 8 to 12 percent |
Build your own budget properly rather than borrowing someone else’s, using the crop cost of production calculator and the farm budget planner. The broader farm finance calculator set covers loans, insurance and profit and loss.
Yield Expectations
Be honest about what stage you are at.
| Management level | Yield range | Typical profile |
| Poor | 4 to 7 t/ha | Ungraded seed, late planting, weed pressure |
| Average | 8 to 11 t/ha | Reasonable practice, some timing slippage |
| Good | 12 to 16 t/ha | Graded seed, disciplined water and weeds |
| Excellent | 17 to 22 t/ha | Full system control, clean seed, ideal conditions |
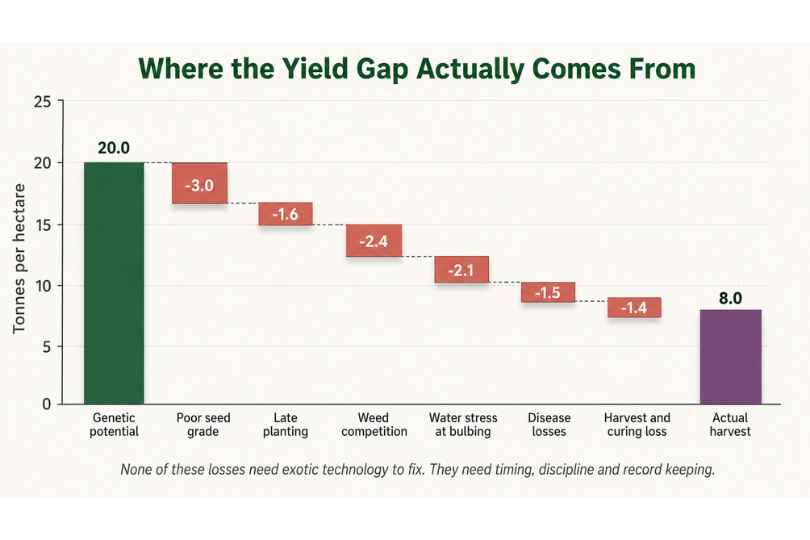
Figure 33. Where the yield gap actually comes from.
Note what is in that waterfall. None of the losses require exotic technology to fix. Seed grading, planting date, weed timing, water discipline, disease prevention and careful harvest handling are all management decisions.
First commercial season, plan for the average column. If you budget for excellent and deliver average, you have a financing problem rather than a farming problem.
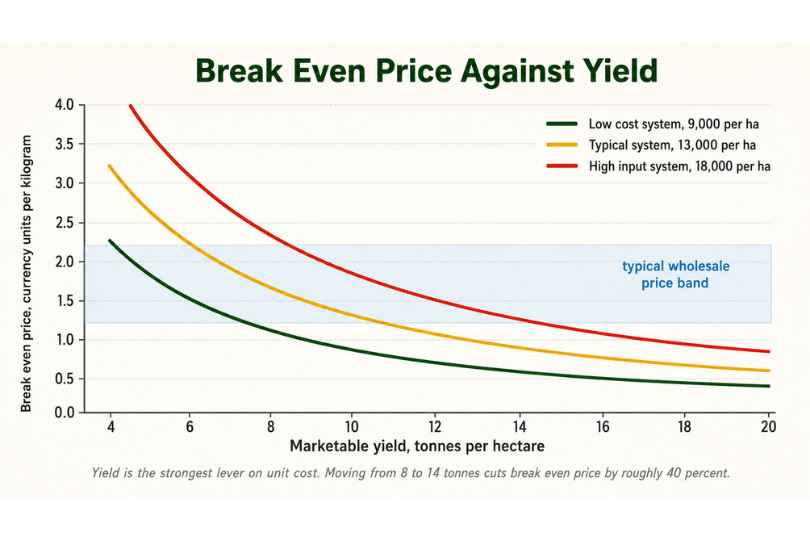
Figure 34. Break even price against yield for three cost structures.
Break even price equals total cost per hectare divided by marketable yield per hectare.
The chart makes the central point better than words can. Yield is a far stronger lever on unit cost than cost cutting is. Moving from 8 to 14 tonnes per hectare cuts your break even price by roughly 40 percent, which is a much larger effect than you will ever achieve by shaving input budgets. Cutting the fertiliser or weeding budget to save money usually raises unit cost, because yield falls faster than cost does.
Calculate yours with the break even price calculator and set your asking price with the selling price calculator.
Cash Flow Reality
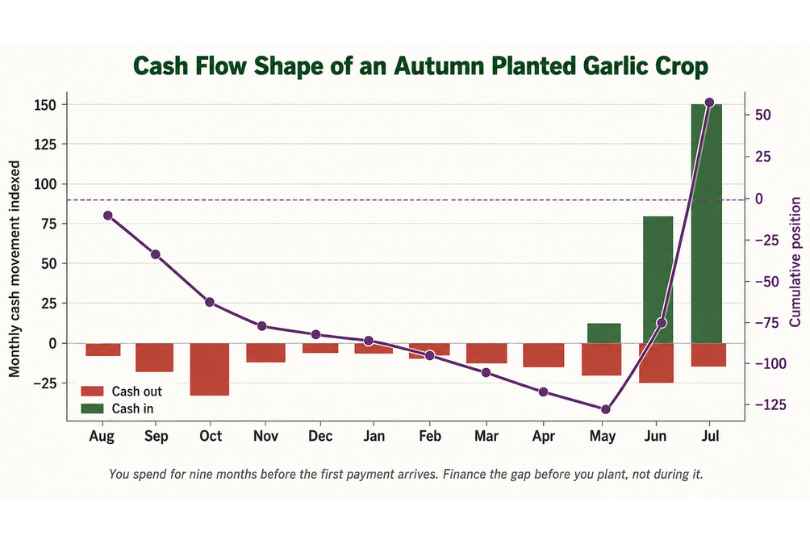
Figure 35. The cash flow shape of an autumn planted garlic crop.
This is the chart that catches out growers new to garlic. You spend heavily in autumn on seed, land preparation and planting, spend steadily through winter and spring on weeding, water and protection, spend heavily again at harvest and curing, and receive nothing at all until the crop is cured, graded and sold.
That is nine to eleven months of negative cash flow before the first payment arrives.
Plan for it explicitly. Arrange working capital before planting, not in March when the weeding bill lands. Stagger varieties so that early maturing types generate some cash flow ahead of the main crop. Consider forward contracts for part of the crop. And if you are borrowing, model the repayment schedule with the farm loan EMI calculator.
Labour Costs
Labour is the cost line most often underestimated, because it is spread across many small operations rather than arriving as one invoice.
| Operation | Conventional hours per hectare | Organic hours per hectare |
| Planting, semi mechanised | 30 to 60 | 30 to 60 |
| Weeding | 60 to 150 | 200 to 400 |
| Scaping, hardneck only | 25 to 45 | 25 to 45 |
| Harvest, hand pulled | 80 to 160 | 80 to 160 |
| Curing management | 15 to 30 | 15 to 30 |
| Grading and packing | 40 to 90 | 40 to 90 |
Price these against local wage rates with the farm labour cost calculator before the season starts.
Equipment ROI
The most common capital mistake in garlic is buying equipment ahead of area.
A precision clove planter that saves 40 labour hours per hectare pays back quickly at 40 hectares and never pays back at 4. Run every purchase through the farm equipment ROI calculator, including realistic figures for maintenance, depreciation and the seasons in which you will not use it.
Contract hire and machinery sharing rings are underused in garlic and often beat ownership at mid scale.
Risk and Insurance
Garlic carries real, quantifiable risks: weather at planting and harvest, disease, price volatility, and labour availability.
Manage the risk you can with diversification across varieties and planting dates, forward contracts for a portion of production, and staged harvest windows. Transfer the rest where sensible. Model premiums with the crop insurance premium calculator, and check what public support exists in your jurisdiction with the agriculture subsidy calculator.
Marketing and Selling the Crop
Growing 16 tonnes per hectare means nothing if you sell it badly.
Market Channels
| Channel | Price level | Volume capacity | Requirements |
| Wholesale and terminal market | Lowest | Very high | Volume, consistency, grading |
| Supermarket contract | Low to moderate | High | Certification, traceability, packaging |
| Food service and restaurant | Moderate to high | Moderate | Reliability, quality, delivery |
| Farmers market and direct | Highest per kilogram | Low | Time, presentation, customer service |
| Seed garlic sales | Highest overall | Low to moderate | Reputation, health status, variety appeal |
| Processing and dehydration | Lowest | Very high | Solids content, contracted volume |
| Value added products | Highest margin | Low | Processing capacity, food safety compliance |
Most successful mid scale operations run three or four channels rather than one. It smooths cash flow and protects you when a single buyer changes their plans.
Pricing Strategy
Know your cost per kilogram before you quote a price. That sounds obvious and is routinely ignored.
Then price against the market rather than against your costs alone, and remember that seed garlic and premium graded fresh garlic usually command two to five times the commodity price. Selling your best 20 percent as seed stock can generate as much revenue as the other 80 percent.
Timing matters too. Prices in most markets are lowest immediately after the main harvest and strongest in the late storage window before new season supply arrives. That is the arbitrage that justifies storage investment, when the numbers work.
Value Added Products
Black garlic, garlic powder, garlic paste, peeled cloves, pickled scapes and garlic oil all convert lower grade product into higher value product.
Two cautions. Value added processing brings food safety regulation, packaging cost and shelf life management with it, and it is a different business from farming. Start small, prove the market, then scale.
Contracts and Buyer Relationships
Forward contracts trade upside for certainty. In a volatile market that is often a good trade, especially for a grower carrying debt.
Read the specification carefully. Size bands, defect tolerances, packaging, delivery windows and rejection terms are where contracts actually bite. A contract at an attractive price with a 60 mm minimum size is worthless if your crop averages 55 mm.
Organic and Regenerative Large Scale Garlic
Garlic is one of the better crops for organic production, largely because its main pest problems are managed culturally rather than chemically.
What Changes
Fertility shifts to compost, manure, cover crops and permitted amendments, with the timing challenge described in the nutrition section. Weed control shifts to stale seedbeds, mulch, mechanical cultivation and hand labour, which is the single largest cost difference. Disease control shifts almost entirely to prevention through rotation, clean seed and airflow, supported by permitted biologicals and copper.
Expect yields 10 to 25 percent below a well run conventional system, and expect labour costs to roughly double.
Certification Timeline
Most organic standards require a transition period of about three years from the last prohibited input. Plan the rotation, the record keeping and the input sourcing well before you need the certificate, and budget for the years in which you farm organically without yet receiving the premium.
Organic Weed Control Economics
This is where organic garlic succeeds or fails. Plan for 200 to 400 labour hours per hectare of weeding without plastic mulch. Mulch, camera guided cultivation and rigorous stale seedbed practice are the three interventions that most reliably bring that number down.
The ATTRA guide to organic Allium production is the best single free reference on organic garlic systems and covers permitted material options in detail.
Premiums and Market Access
Organic garlic typically commands 30 to 100 percent premiums depending on market and channel, and organic seed garlic commands more still. Whether that covers the yield gap and the labour gap depends entirely on your local labour cost, which is why the same decision is obviously right in one country and obviously wrong in another.
Mechanization and Technology
Matching Equipment to Area
Return to Figure 15. The tiers are not aspirational stages to climb as fast as possible. They are the points at which specific equipment starts paying for itself.
Precision Agriculture Tools
Variable rate fertiliser application based on soil zone mapping, yield mapping by block, and satellite or drone imagery for early stress detection all work in garlic. They work best at scale, where the fixed cost spreads across enough hectares.
Assess the case with the precision agriculture ROI calculator.
Drones, Sensors and Smart Irrigation
Soil moisture sensor networks paired with automated valves genuinely improve water discipline, which as we have seen is the biggest single yield lever. Evaluate with the smart irrigation ROI calculator.
Drone application is increasingly practical for foliar sprays and spot treatments, particularly in wet conditions where ground rigs would rut the field. Cost it with the drone spray cost calculator.
The wider agritech calculator set covers the rest of the technology investment questions.
Energy and Carbon
Curing and cold storage are energy intensive. Solar generation often pencils out well on farms with large shed roofs and a summer curing load that coincides with peak generation. Model it with the solar panel for farm power calculator.
If you supply retailers with emissions reporting requirements, or you simply want a baseline, start with the farm carbon footprint calculator.
Regional Adaptation
The principles in this guide are universal. The dates and varieties are not.
Cold Continental Regions
Where winters are severe, choose hardy hardnecks such as Porcelain and Purple Stripe types, plant four to six weeks before the ground freezes, cover deeper at 8 to 10 cm, and mulch with 10 to 15 cm of straw for winter protection. Harvest is typically mid to late summer.
Temperate Maritime Regions
Mild wet winters mean drainage and foliar disease are your main constraints. Raised beds are essential. Both hardnecks and softnecks perform. Rust and downy mildew pressure is high, so airflow, spacing and drip rather than overhead irrigation all matter.
Mediterranean Climates
Wet winters and dry summers suit garlic extremely well, which is why so much of the world’s commercial crop grows in this climate type. Plant in autumn, rely on winter rain for early growth, then irrigate heavily through spring bulb fill. Softnecks dominate. Harvest is late spring to early summer.
Subtropical and Tropical Highland Regions
The constraint is insufficient natural cold. Options are low chill softneck and Creole types, pre chilling seed at 4 to 10 degrees Celsius for four to eight weeks, and planting at the coolest point of the year. In the tropics, elevation substitutes for latitude, and garlic is grown successfully at altitude in East Africa, Southeast Asia and the Andes.
South Asian Plains
Across northern India and Pakistan, garlic is a rabi season crop. Planting typically runs from October into early November, with harvest from March into April. Both the crop calendar and the irrigation regime are tight, and heat at the end of the season can cut bulb fill short, which makes early planting and disciplined irrigation through February and March especially important. Local softneck and Creole type selections generally outperform imported hardnecks, and pre chilling seed is common practice.
For any region, build your own calendar rather than importing one. The crop calendar generator, frost date calculator and growing degree days calculator exist for exactly this purpose.
Common Mistakes and How to Avoid Them
These ten account for the large majority of failed or disappointing commercial garlic crops.
Planting too late. The most common and most expensive error. Fewer leaves at bulb initiation permanently caps bulb size. Fix: work backwards from your frost date and treat the planting window as immovable.
Planting ungraded seed. Small cloves produce small bulbs while occupying full spacing and full input cost. Fix: grade into three bands and plant them in separate blocks.
Saving seed from a mediocre block. This is how a good line degrades. Fix: select from your best block, always, and refresh nuclear stock on a cycle.
Letting weeds run in early spring. The critical period is the one growers are busiest during. Fix: budget the labour before the season and treat the window as non negotiable.
Water stress during bulb fill. Irrecoverable. Fix: measure soil moisture every two to three days through the critical window.
Late nitrogen. Produces thick necks, delayed maturity and a crop that will not store. Fix: stop nitrogen at early bulb fill.
Harvesting late. A crop that looks bigger every day is actually losing wrappers every day. Fix: test dig from three weeks out and lift at five to six leaves down.
Washing the crop. Guarantees neck rot. Fix: never wash before curing. Brush dry after.
Under curing. Most storage failures are curing failures that appear two months later. Fix: cure until the neck is fully sealed, and check the middle of the stack, not the outside.
Storing at 4 to 12 degrees Celsius. The sprouting zone. Fix: go properly cold or properly warm and dry.
Your First Twelve Months: A Practical Roadmap
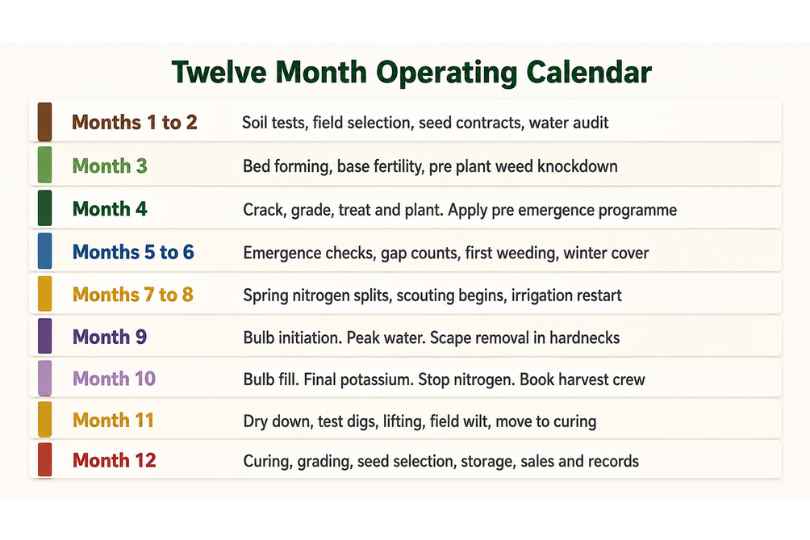
Figure 36. A twelve month operating calendar for a commercial garlic block.
Phase One: Months One and Two, Planning
Select and score fields. Take soil tests and act on the results. Order seed, because good seed sells out. Audit your water supply. Build the budget and arrange finance. Plan your curing and storage capacity against your intended area, not your hoped for area.
Phase Two: Month Three, Preparation
Apply lime and compost. Subsoil where needed. Incorporate cover crops at least three to four weeks before planting. Form beds and let them settle. Lay drip. Apply and incorporate base fertility.
Phase Three: Month Four, Planting
Crack and grade seed within 48 hours of planting. Treat and dry cloves. Plant to depth and orientation. Apply the pre emergence programme. Record everything: lot, block, date, population.
Phase Four: Months Five to Twelve, Management and Harvest
Follow the crop through emergence checks and gap counts, winter monitoring, spring nutrition splits, weekly scouting from emergence, the critical weed free window, peak irrigation through bulb initiation and fill, scaping in hardnecks, water cut off, test digs, harvest, curing, grading, seed selection, storage and sale.
Then, and this is the part that separates operations that improve from operations that repeat, sit down with your records and write up what happened.
Record Keeping and Continuous Improvement
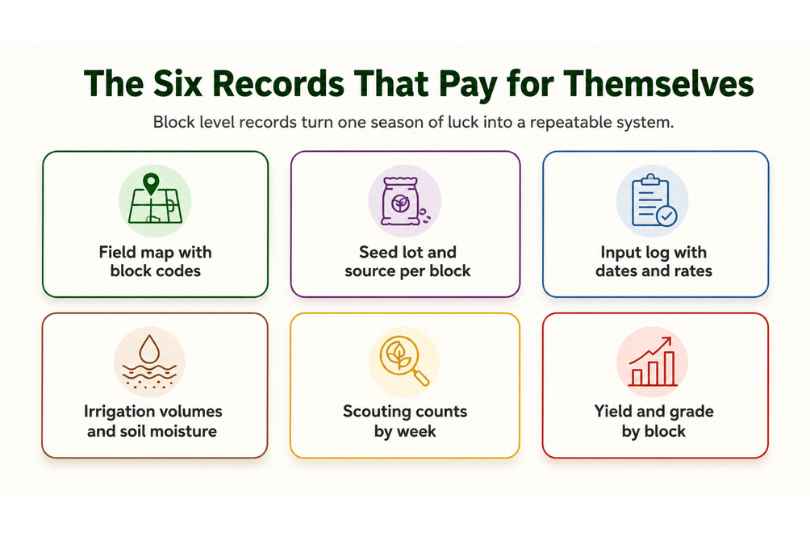
Figure 37. The six records that pay for themselves.
Garlic is an annual experiment with a nine month feedback loop. You get roughly forty attempts in a farming career. Records are what turn those attempts into a learning curve rather than forty independent gambles.
Keep, at minimum: a field map with permanent block codes, seed lot and source by block, an input log with dates and rates, irrigation volumes and soil moisture readings, weekly scouting counts, and yield and grade by block.
Then run a proper post season review each year. Compare planned against actual for every operation. Identify the three biggest gaps. Pick two changes for next season, not ten, because two changes actually get implemented.
Growers who do this consistently move from the average column to the good column in about three seasons, and from good to excellent in about five.
Frequently Asked Questions
How much garlic can you grow per hectare?
A well managed commercial crop yields 12 to 18 tonnes per hectare of cured bulbs. Excellent operations reach 20 tonnes or more. First time growers commonly achieve 6 to 10 tonnes, with the gap coming mostly from seed grade, planting date, weed competition and water management rather than from soil or climate.
How much seed garlic do I need per hectare?
Roughly 1.2 to 1.8 tonnes of seed bulbs per hectare, depending on plant population and clove size. At 280,000 plants per hectare with 5 gram cloves and 85 percent clove recovery, you need about 1.65 tonnes of bulbs. Confirm with the seed rate calculator.
Is garlic farming profitable at scale?
It can be strongly profitable, but it is capital hungry and slow to pay. Seed is 25 to 35 percent of variable cost, cash flow runs negative for nine to eleven months, and profitability depends heavily on yield, grade out percentage and market channel. Model it before you commit with the farm profit and loss calculator.
When is the best time to plant garlic commercially?
Autumn, four to six weeks before your first hard frost, when soil temperature at 10 cm is 10 to 16 degrees Celsius. In Mediterranean and subtropical regions this typically falls between October and early December. Spring planting is a fallback and normally yields 30 to 50 percent less.
How deep should garlic be planted?
Four to six centimetres of soil cover above the clove tip in mild winter areas, and eight to ten centimetres where soils freeze hard. Add about two centimetres in very light sandy soils.
How do I know when garlic is ready to harvest?
When five to six lower leaves have browned and three to four upper leaves remain green. Each green leaf represents an intact bulb wrapper. Confirm with test digs every two to three days as you approach the window.
Why are my garlic bulbs small?
The four usual causes, in order of frequency: planting too late so the crop had too few leaves at bulb initiation, planting small ungraded cloves, weed competition during the critical period, and water stress during bulb fill. Soil fertility is a less common cause than growers assume.
What is the difference between hardneck and softneck garlic commercially?
Hardnecks produce a scape, have fewer larger cloves, peel easily, taste more complex and store four to seven months. Softnecks have more, smaller cloves in layers, store eight to twelve months, tolerate machine handling and braid well. Softnecks dominate industrial production, hardnecks dominate premium fresh market.
Can garlic be grown without cold winters?
Yes, with adaptation. Use low chill softneck, Creole, Turban or Asiatic types, and pre chill seed cloves at 4 to 10 degrees Celsius for four to eight weeks before planting. Without sufficient cold, cloves produce single undivided rounds rather than segmented bulbs.
How long does garlic take to grow?
Autumn planted garlic takes roughly 210 to 260 days from planting to harvest, which is eight to nine months. Spring planted crops take about 90 to 150 days but yield substantially less.
What is the best fertiliser programme for garlic?
There is no single answer without a soil test, but a 15 tonne crop typically needs 150 to 200 kg nitrogen, 60 to 90 kg phosphate, 150 to 200 kg potash and 30 to 50 kg sulphur per hectare. Split nitrogen across four applications and stop it at early bulb fill. Build the actual programme with the NPK fertiliser calculator.
How do I stop garlic sprouting in storage?
Keep it out of the 4 to 12 degree Celsius band, which is the range that breaks dormancy. Store either at 0 to 2 degrees Celsius or at 18 to 25 degrees Celsius, in both cases at 60 to 70 percent relative humidity with gentle continuous airflow.
What causes white rot and can it be treated?
White rot is caused by the soilborne fungus Stromatinia cepivora. It cannot be treated. Sclerotia survive in soil for up to 40 years and germinate when they detect Allium root exudates. Management is entirely preventive: certified clean seed, strict equipment sanitation, and never planting Alliums into an infested field.
Should I remove garlic scapes?
Yes, in hardneck varieties. Removing scapes at the one full curl stage typically increases bulb weight by 15 to 25 percent, and the scapes themselves are a saleable product.
How much water does garlic need?
Roughly 450 to 650 mm across a season, with peak demand of 5 to 7 mm per day during bulb initiation and fill. Stop irrigation two to three weeks before harvest. Calculate your local figure with the crop water requirement calculator.
Can I plant garlic from the supermarket?
Not for commercial production. Supermarket garlic is often treated with sprout inhibitors, is frequently a variety unsuited to your climate, and carries unknown virus, nematode and fungal status. Introducing stem and bulb nematode or white rot to a clean field this way is a catastrophic and entirely avoidable risk.
Final Word
Learning how to grow garlic on a large scale is less about discovering secrets and more about refusing to compromise on timing. The crop tells you what it needs well in advance. It needs graded seed from a clean source. It needs to go into the ground early enough to build leaves. It needs a weed free field from day 25 to day 115. It needs water it can rely on through bulb fill and no water at all in the final fortnight. It needs to come out of the ground at five to six leaves down, and it needs to be cured hard and fast before anything else happens to it.
Do those six things consistently and you will be in the 12 to 18 tonne range within two or three seasons. Compromise on any one of them and you will spend the season looking for the reason somewhere else.
Start with one block. Grade your seed, hold your planting date, record everything, and compare your numbers honestly at the end of the season. Then scale what worked.
Run your own numbers before you commit a single hectare. Start with the seed rate calculator, the crop water requirement calculator and the crop cost of production calculator, then explore the full farm calculator library and the rest of the crop guides at FoodsFarming.
Sources and Further Reading
- UC Statewide IPM Program, Pest Management Guidelines: Onion and Garlic, UC ANR Publication 3453: https://ipm.ucanr.edu/agriculture/onion-and-garlic/
- Penn State Extension, Garlic Production: https://extension.psu.edu/garlic-production
- Oregon State University, Oregon Vegetables, Garlic: https://horticulture.oregonstate.edu/oregon-vegetables/garlic-1
- Oregon State University, Garlic for Production of Planting Stock: https://horticulture.oregonstate.edu/oregon-vegetables/garlic-production-planting-stock-0
- Oregon State University COAREC, Garlic Seed: https://agsci.oregonstate.edu/coarec/garlic-seed
- ATTRA NCAT, Organic Production of Garlic, Onions and Other Alliums: https://attra.ncat.org/publication/organic-production-of-garlic-onions-and-other-alliums/
- University of Maine Cooperative Extension, Bulletin 2062, White Rot of Garlic and Onions: https://extension.umaine.edu/publications/2062e/
- University of Maryland Extension, White Rot of Onion and Garlic: https://extension.umd.edu/resource/white-rot-onion-and-garlic
- Rutgers NJAES, Ultra Niche Crops Series, Garlic for Small Commercial Growers, FS1289: https://njaes.rutgers.edu/fs1289/
- FAO, FAOSTAT crop production database: https://www.fao.org/faostat/en/
- USDA National Agricultural Statistics Service: https://www.nass.usda.gov/